Skip to content
First 10 customers get 70% off any script

FiveM mechanic job · STO Motors

BuckyMechanic

Real repairs, part by part.

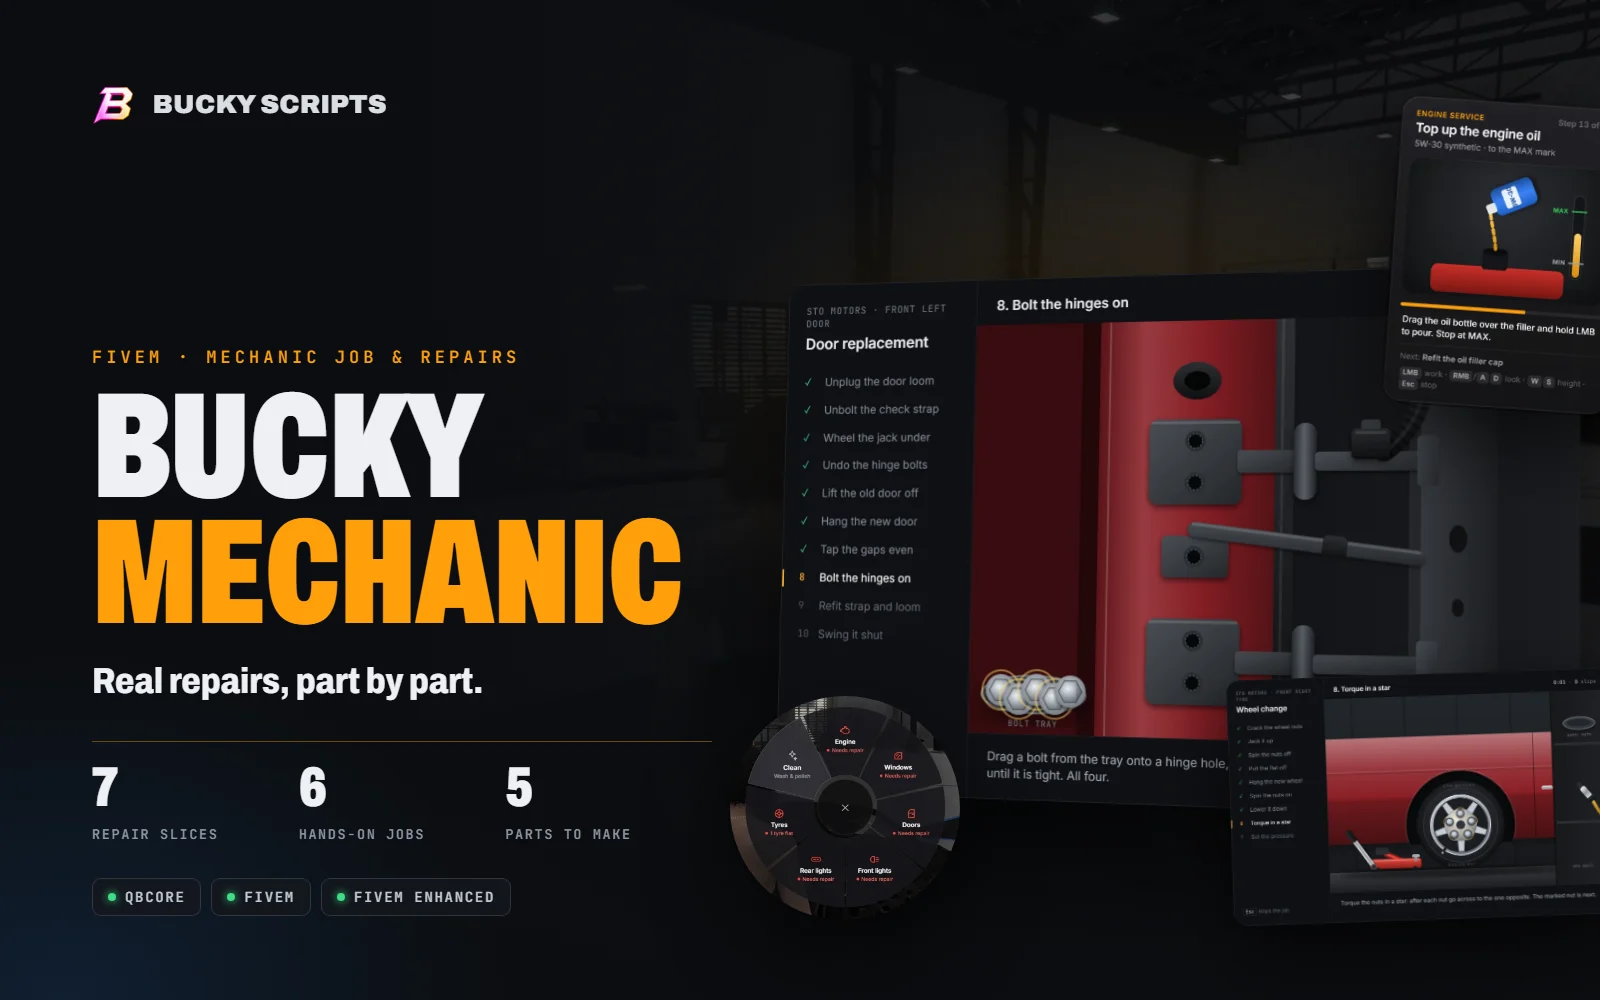
A complete mechanic job for QBCore. Walk up to a wrecked car and see exactly what is broken. Make the replacement part at the workbench, carry it to the car in your hands and fit it with your own tools: bolts you ratchet, glass you vacuum, nuts you torque in a star. Labour is paid from the Central Reserve, so every repair moves real money.

FiveM ready FiveM Enhanced ready QBCore oxmysql Works with Bucky Reserve
7Repair slices on the wheel
6Hands-on repair jobs
5Parts made at the workbench
7Tools that wear out
5Job grades on payroll
$0Printed: labour is paid by the Reserve

Bucky Mechanic

  • QBCore
  • FiveM
  • FiveM Enhanced
  • Cfx.re Keymaster delivery

Secure checkout by Tebex Instant delivery

How a repair works

From wreck to road in five steps

No progress bar that fixes the whole car. Every damaged part needs its own replacement and its own job, and the car only drives out when every part is in.

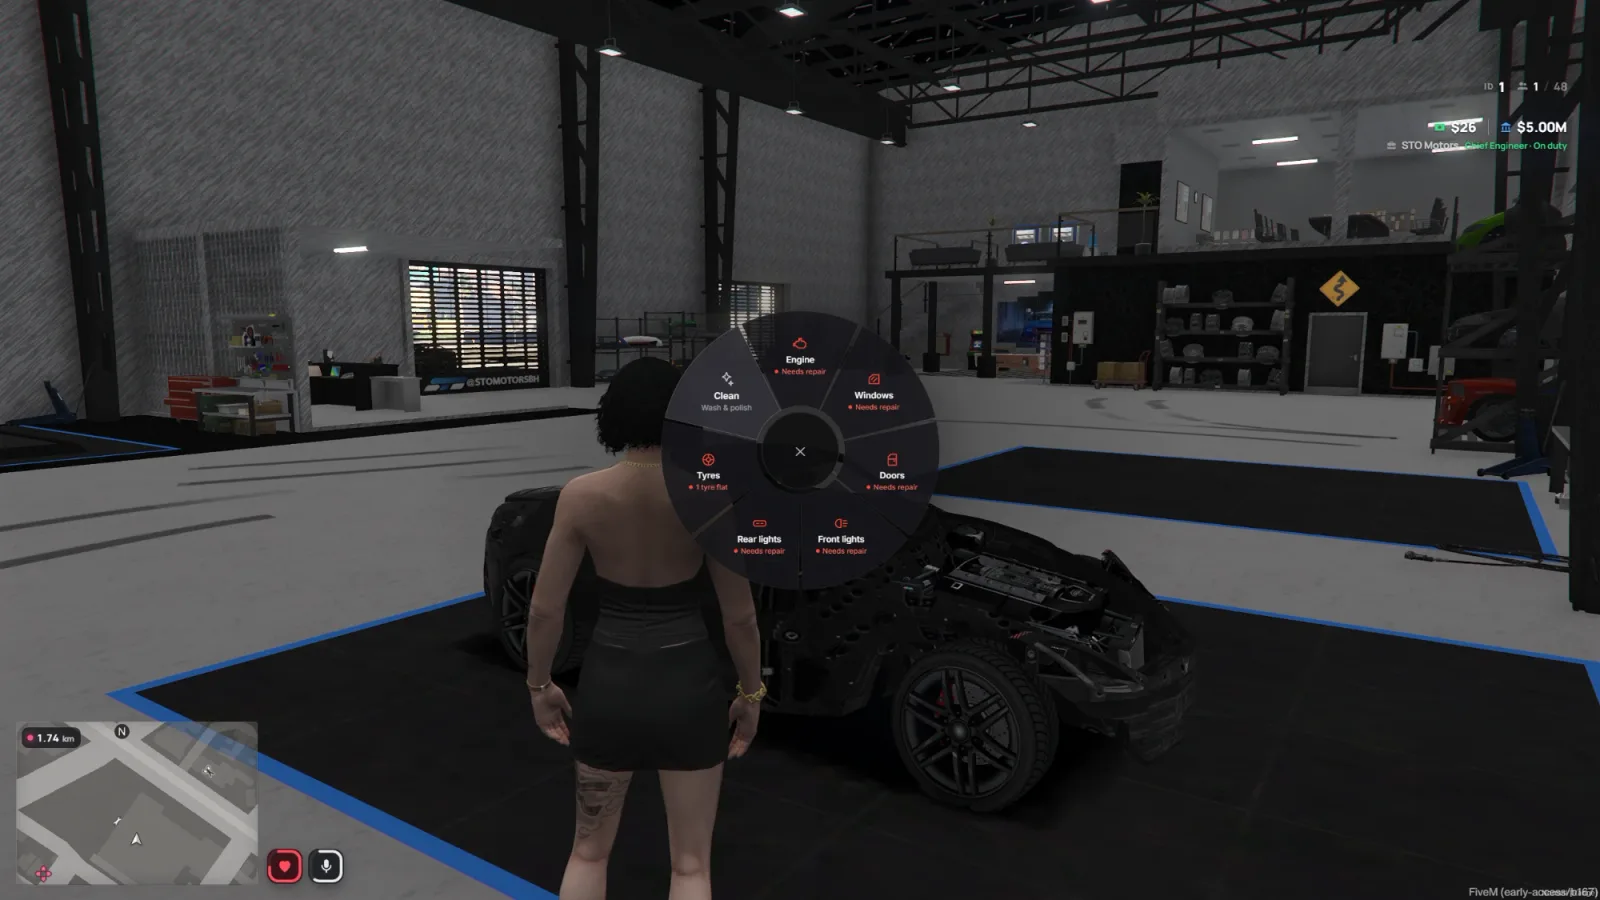
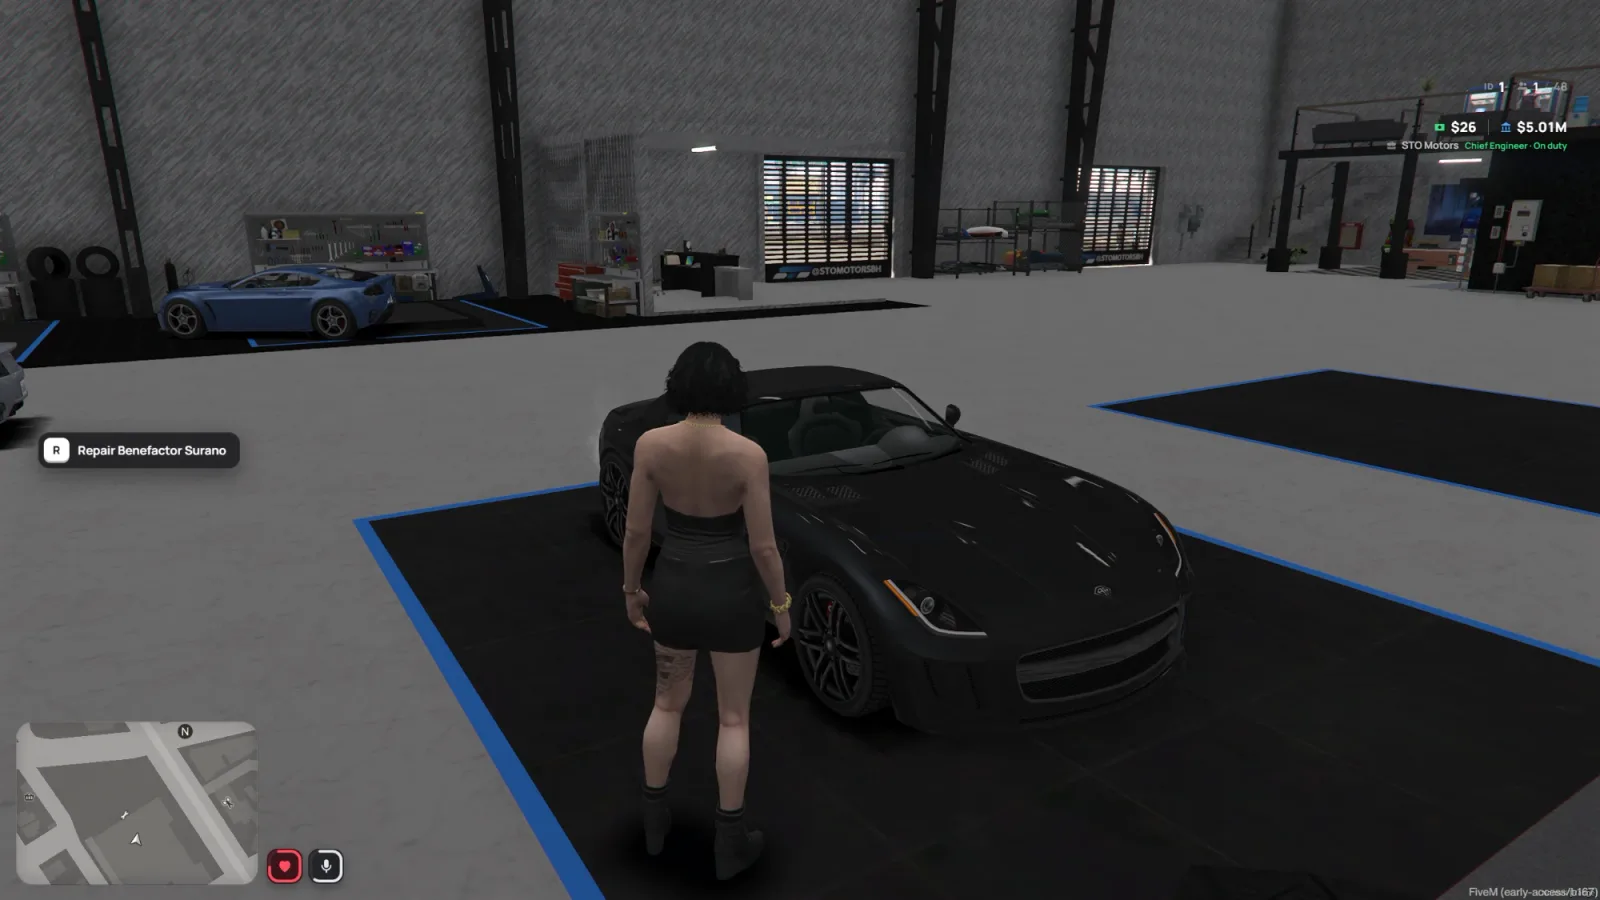
  1. The repair wheel open over a damaged car
    01 · DIAGNOSE

    Press R

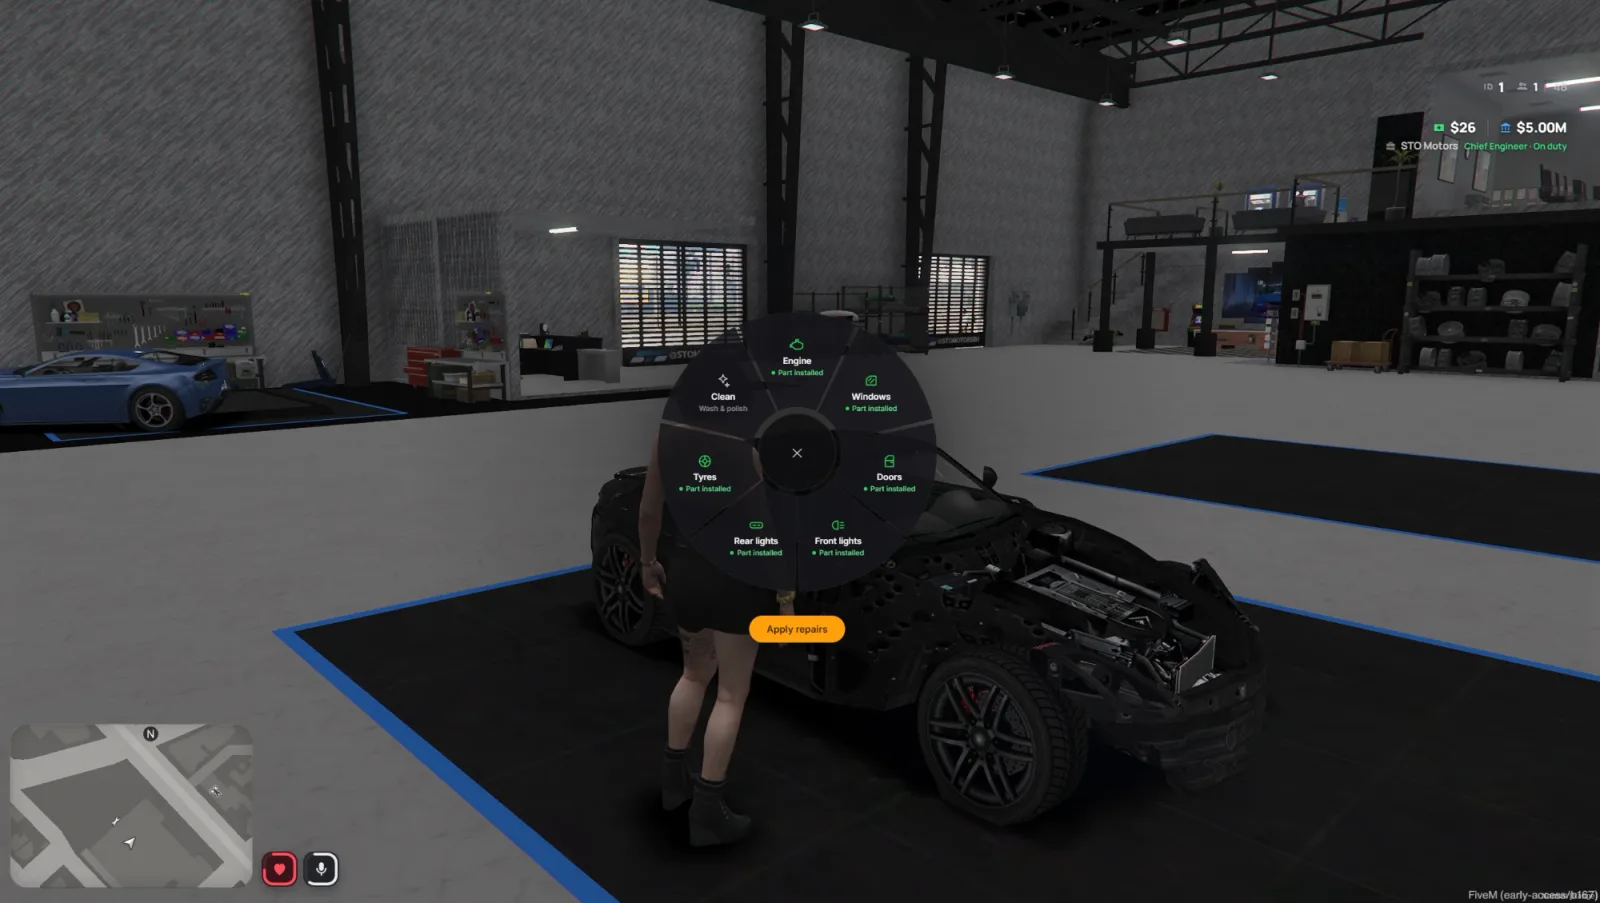
    Stand by the car and the repair wheel shows every part in red, green or grey.

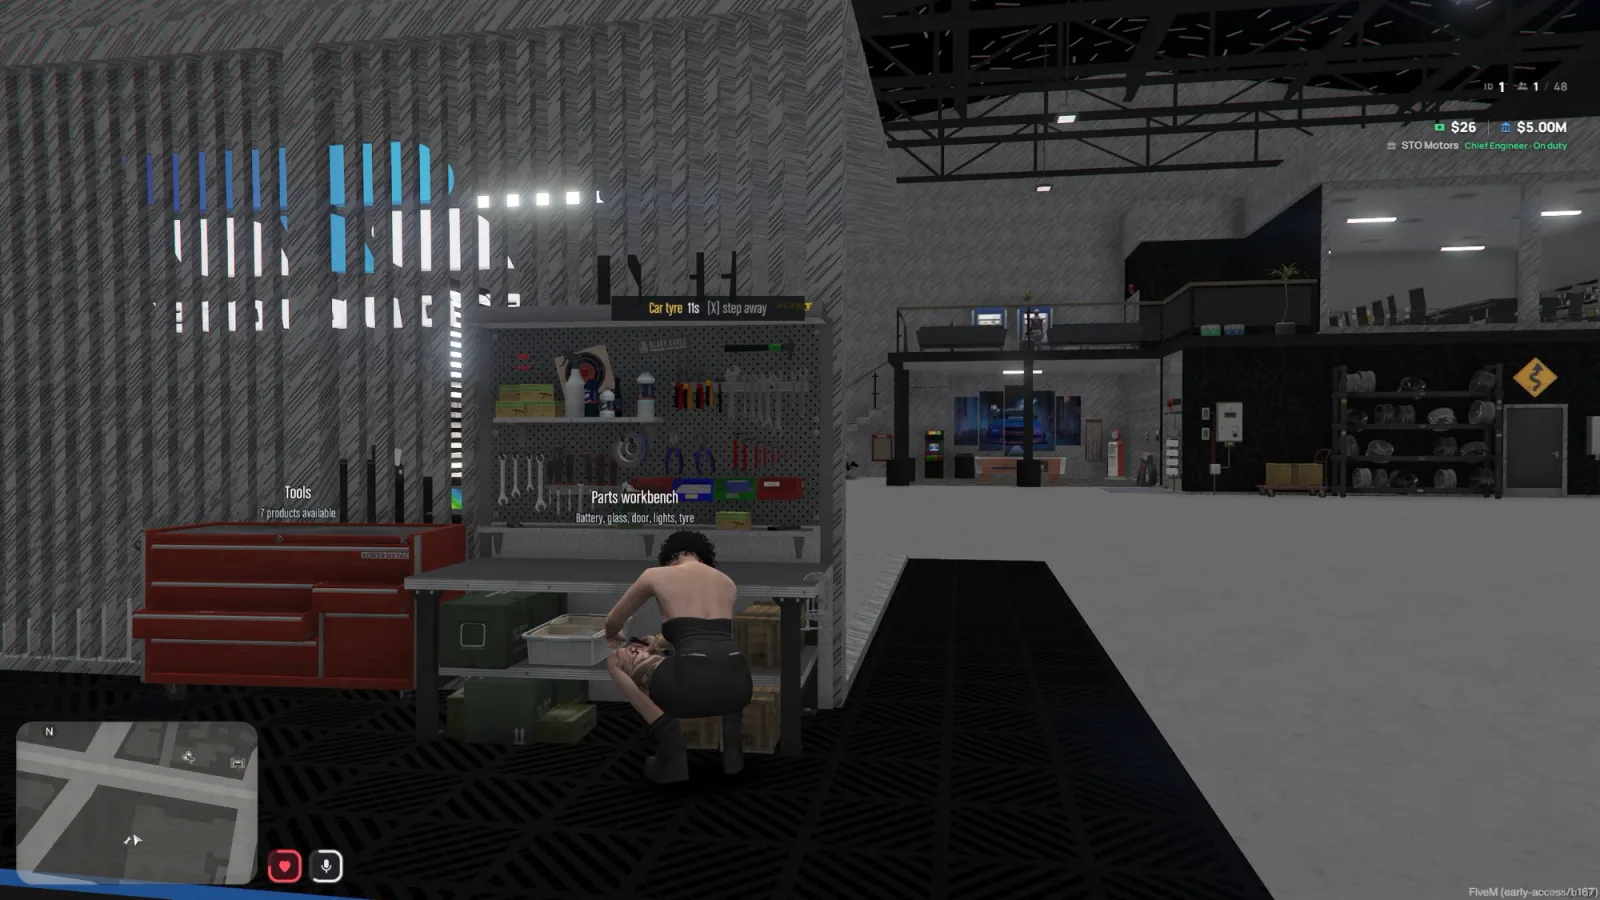
  2. A mechanic making a tyre at the parts workbench
    02 · MAKE

    Make the part

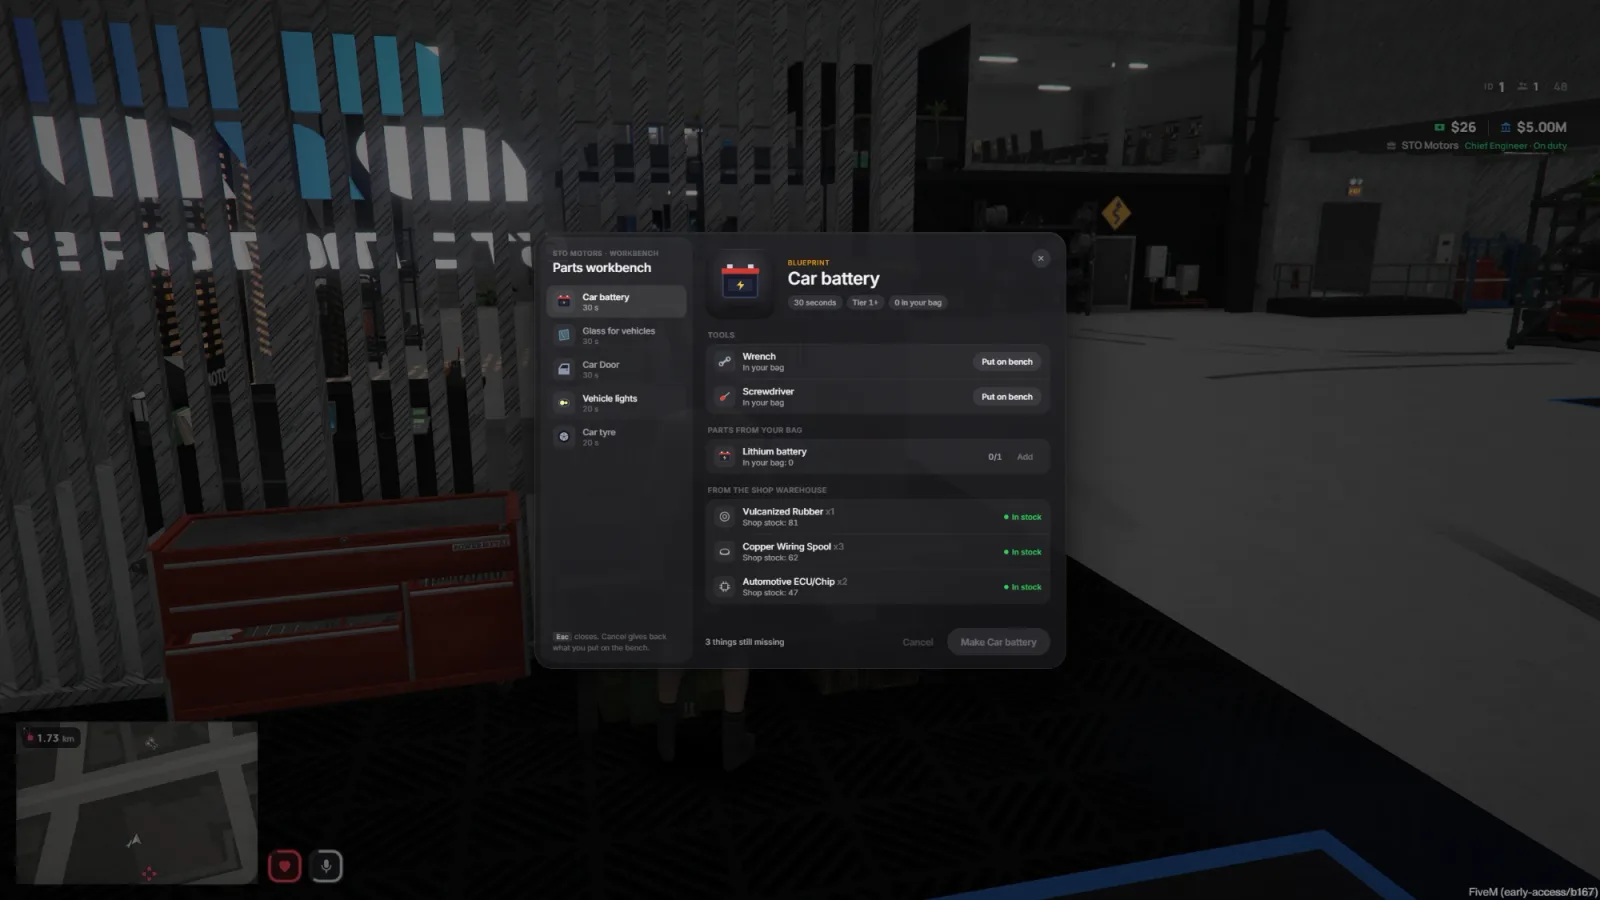
    Put your tools on the bench. Raw materials come from the shop warehouse.

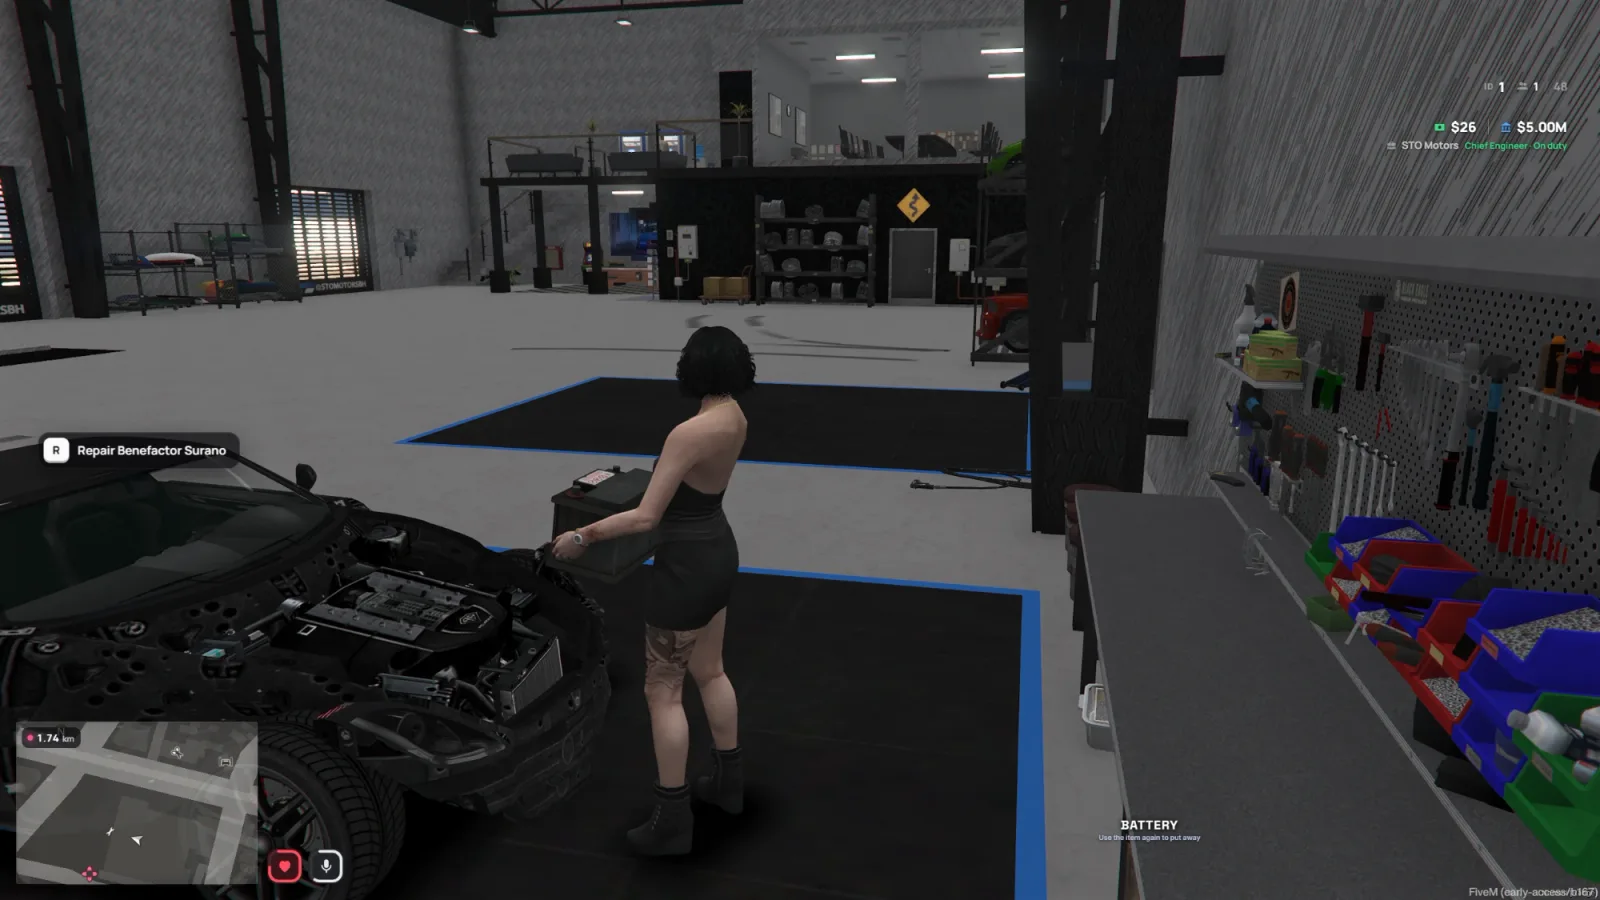
  3. A mechanic carrying a car battery to the car
    03 · CARRY

    Carry it over

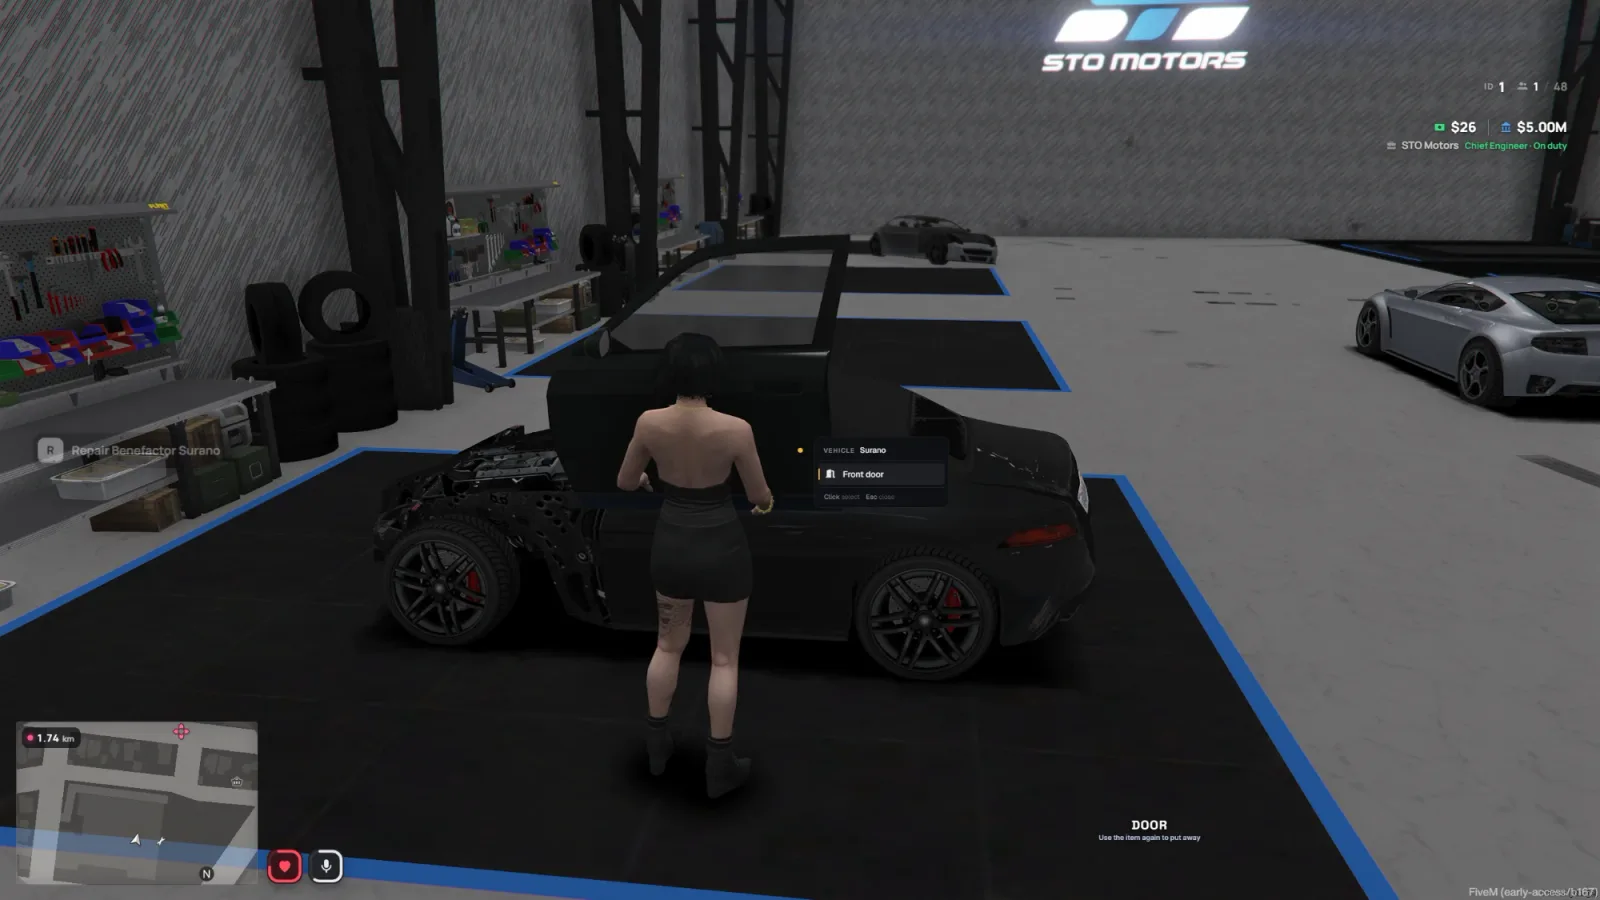
    The part is in your hands: a battery, a sheet of glass, a door, a tyre.

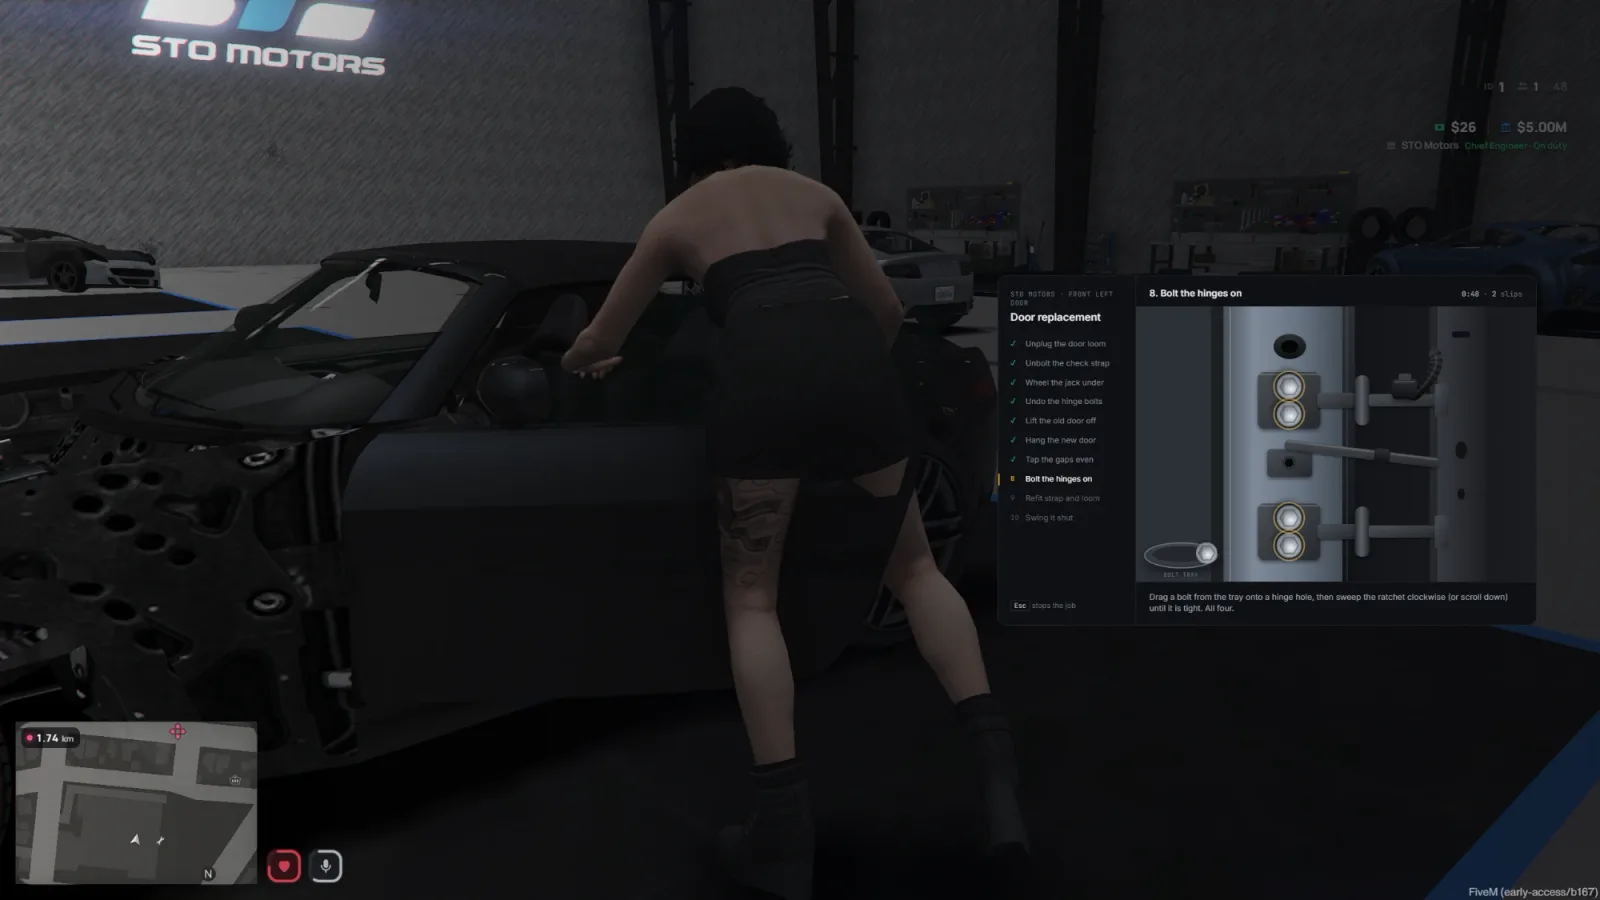
  4. The door job: bolting the hinges on in the close-up panel
    04 · FIT

    Fit it yourself

    A real job for each part, done from the right side of the car.

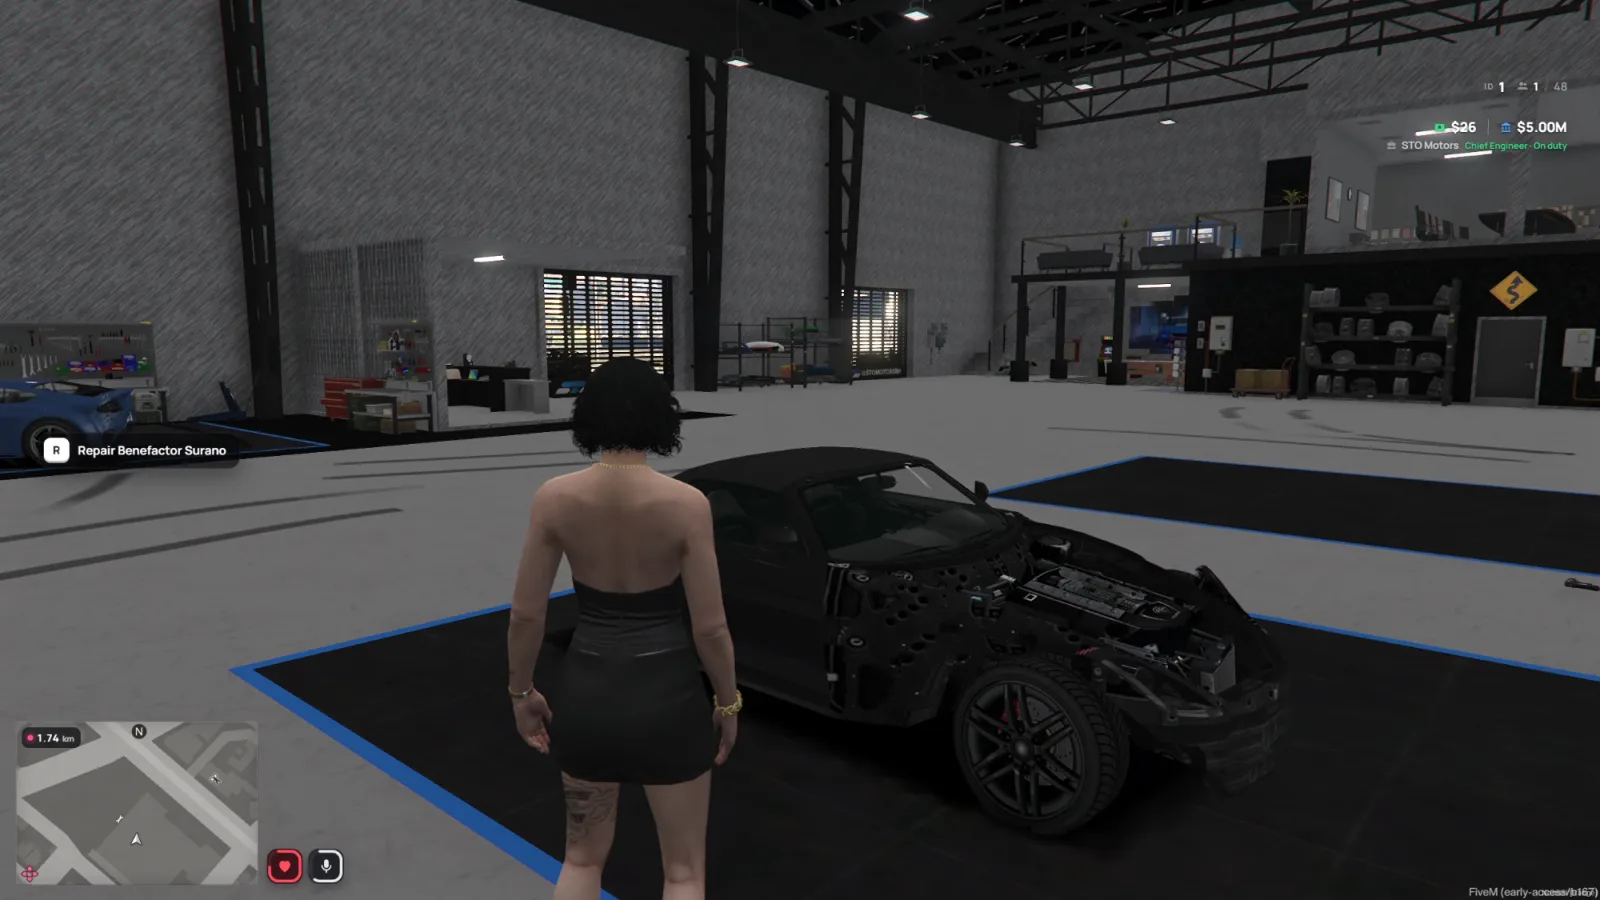
  5. The repaired car in the STO Motors bay
    05 · APPLY

    Apply repairs

    When every slice is green the car is repaired and the labour is paid.

Diagnose

See what's broken

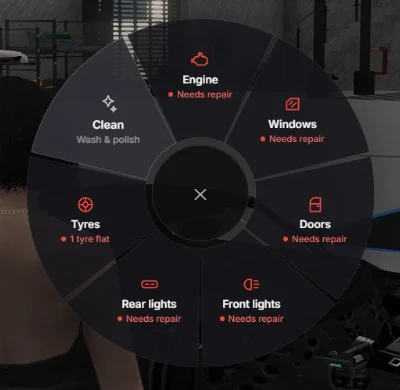
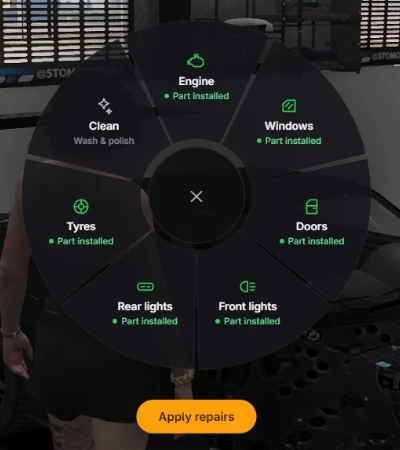
Press R next to any car in the workshop. The wheel reads the real damage: which doors hang, which windows are smashed, which lamps are out and which tyres are flat. Each slice says what it needs, and turns green once the new part is fitted.

1EngineCar battery · in-world 3D job$900
2WindowsGlass for vehicles$450
3DoorsCar door$600
4Front lightsVehicle lights$350
5Rear lightsVehicle lights$350
6TyresCar tyre · one job per flat$250 each
7CleanWalk round and scrub 6 spots$100

Labour paid from the Central Reserve per slice. All amounts are in the config.

The repair wheel with every part needing repair shown in red
Needs repair
Red until a part is fitted
The repair wheel with every part installed in green and the Apply repairs button
Part installed
All green: Apply repairs

Work from the right side

You can't fix a taillight from the bonnet. Each job starts only where a mechanic would really stand. Pick a part from the wrong side and the wheel closes and marks the spot on the floor.

FRONT Engine · Headlights BACK Taillights Left doors & windows Right doors & windows ENGINE TYRE TYRE
Front: engine, headlightsBack: taillightsBeside the door: doors, windowsBeside the wheel: each flat tyre

Engine · in-world 3D

Your character does the work

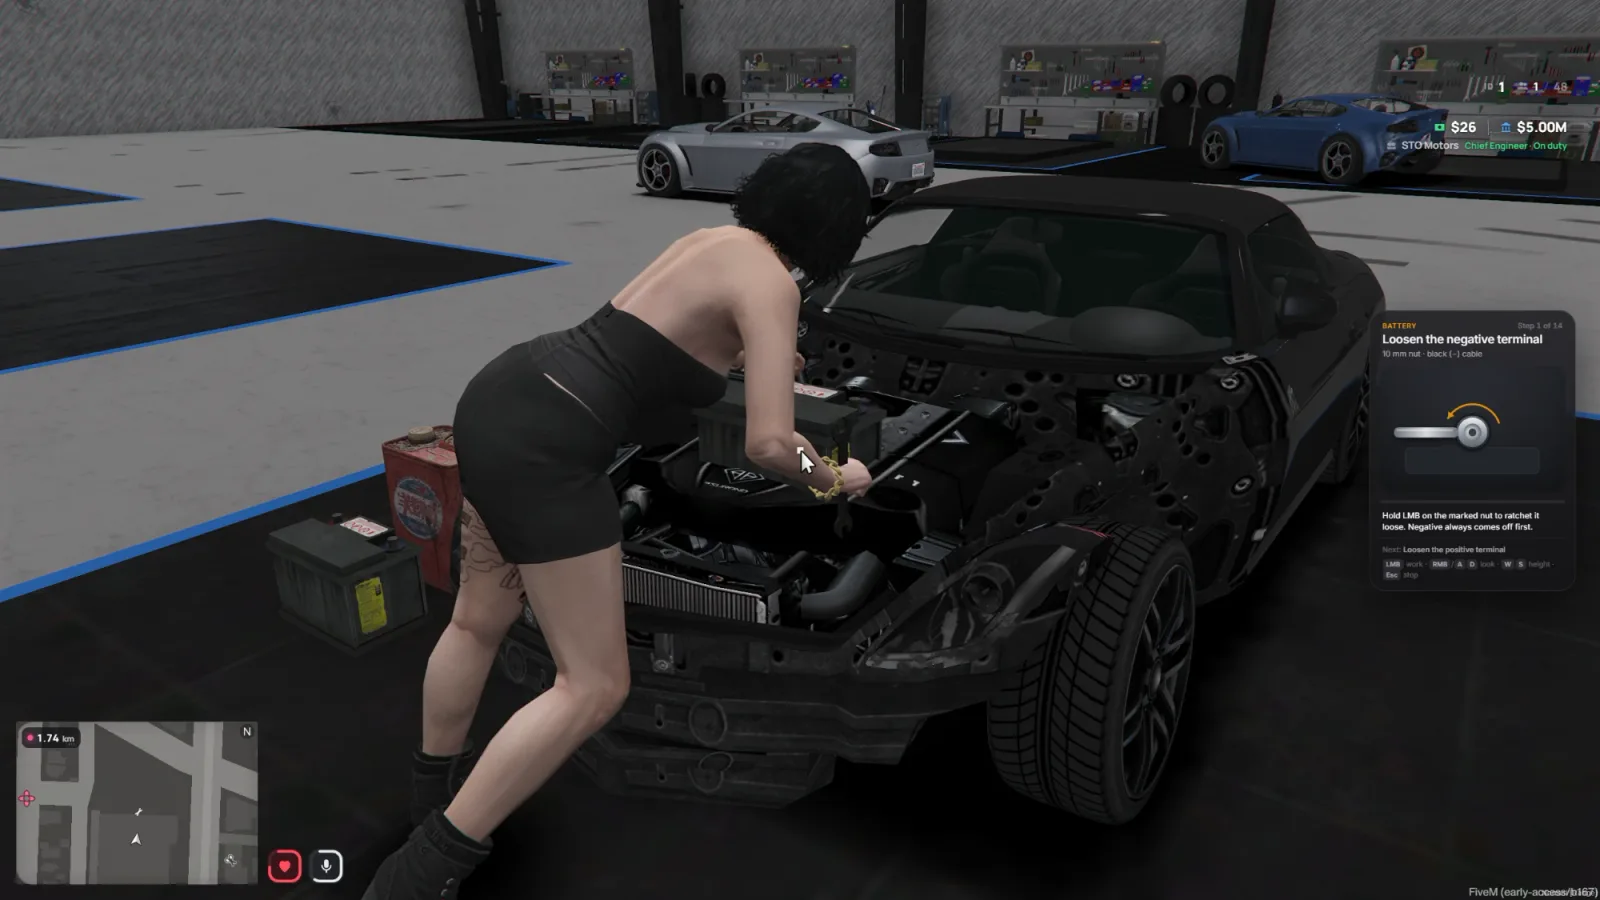
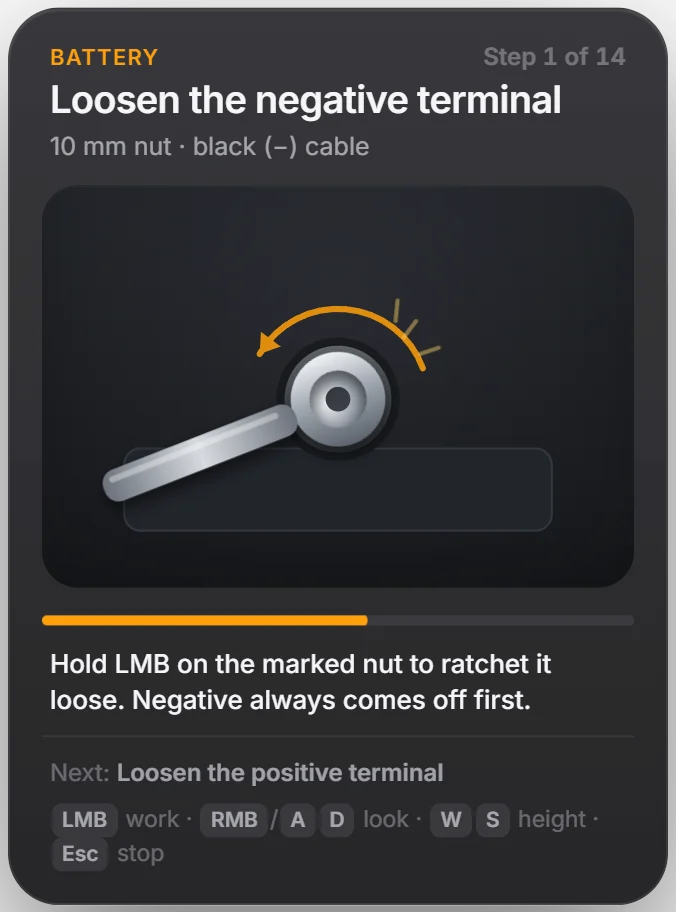
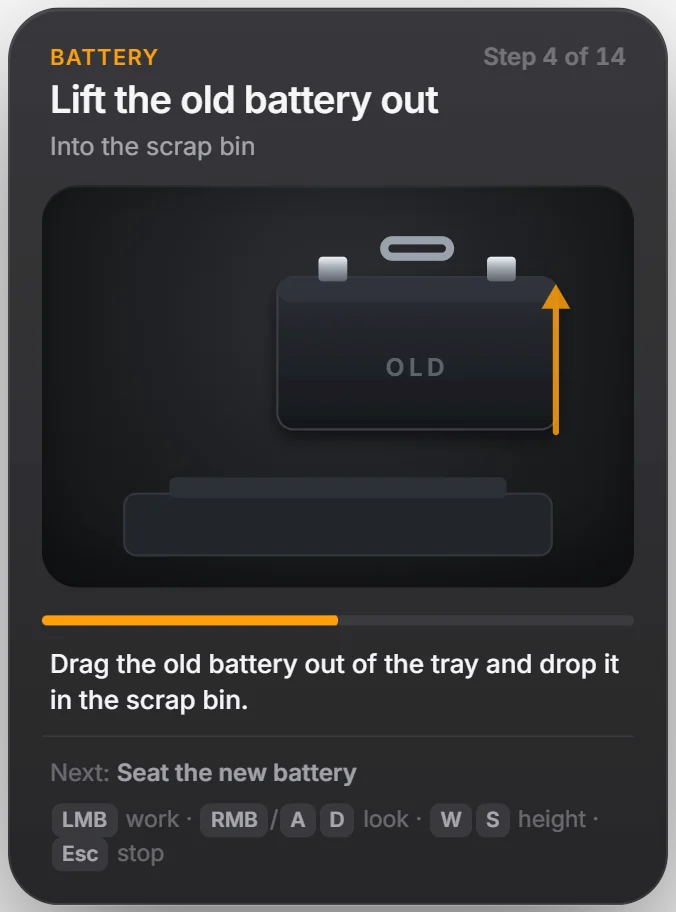
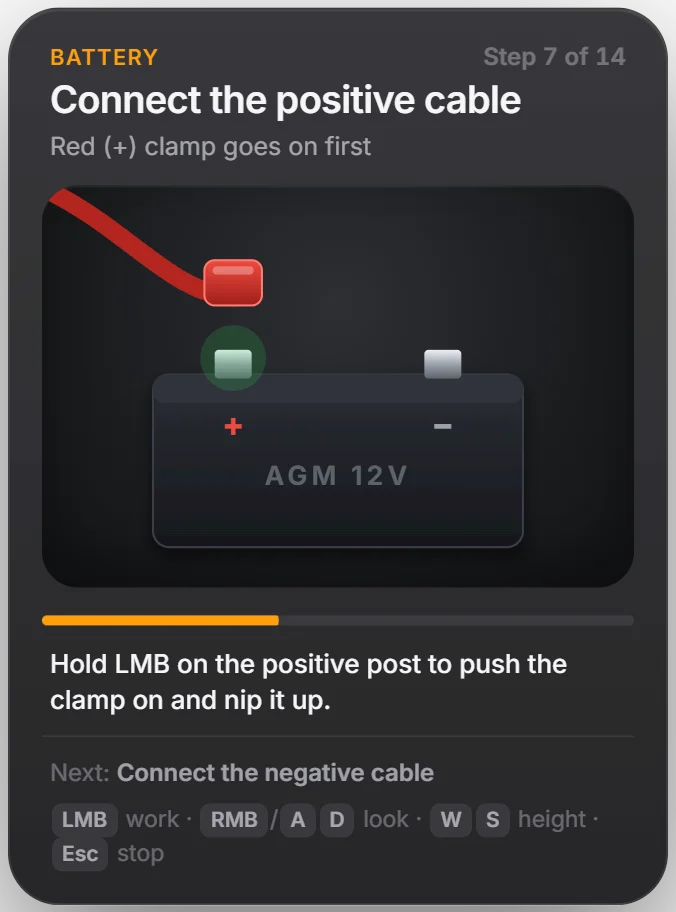
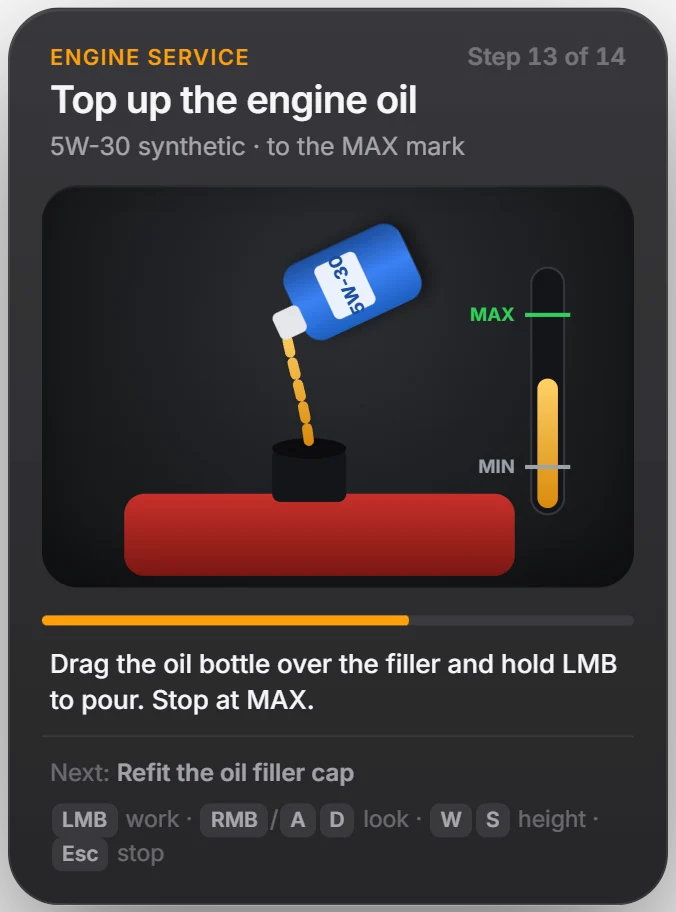
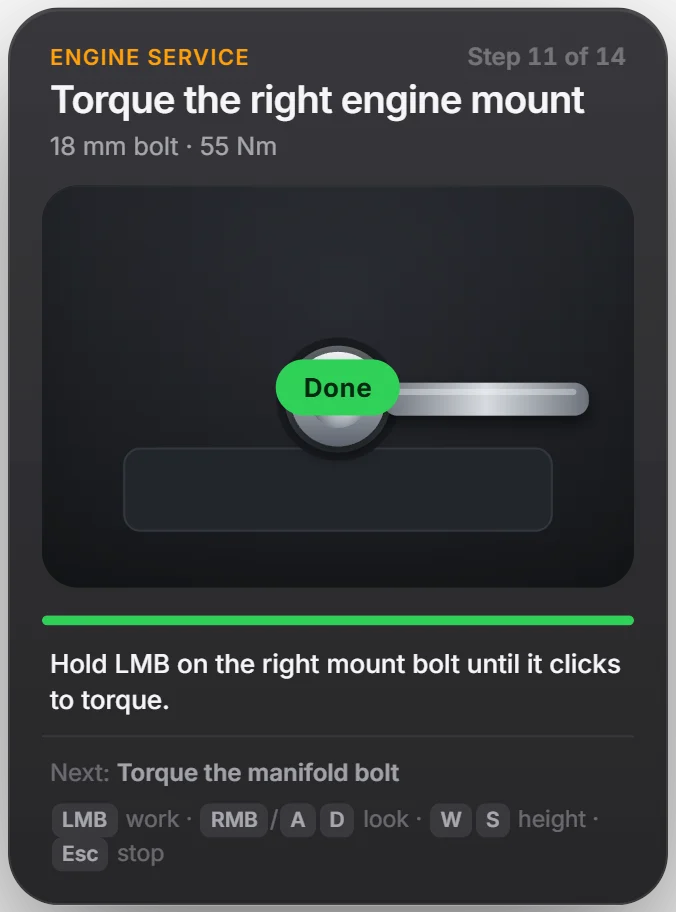
The engine job happens on the real car. Your character leans into the bay with a wrench in hand, lifts the old battery out to the scrap bin and tips the oil bottle into the filler. A small card on the right shows the step, the part, the turning direction and a live drawing of what you're doing.

The engine job in game: the mechanic leaning into the bay with the work card on the right
Live work card. It follows every step, flashes Done when a step lands and never takes the mouse.

Battery · 8 steps

  1. Loosen the negative terminal (10 mm)
  2. Loosen the positive terminal
  3. Undo the hold-down bracket (13 mm)
  4. Lift the old battery into the scrap bin
  5. Seat the new battery
  6. Tighten the hold-down bracket
  7. Connect positive first
  8. Connect negative last

Engine service · 6 steps

  1. Open the oil filler cap
  2. Torque the left mount (55 Nm)
  3. Torque the right mount (55 Nm)
  4. Torque the manifold bolt (25 Nm)
  5. Top up 5W-30 to the MAX mark
  6. Refit the filler cap
Work card: loosen the negative terminal with the wrench
Ratchet a nut
Work card: lift the old battery out
Lift the battery out
Work card: connect the positive cable
Positive on first
Work card: pour oil to the MAX mark
Pour to MAX
Work card: the step done in green
Step done

Close-up jobs

Five jobs, done by hand

For the parts GTA never modelled, the camera frames the real part on your car and a close-up opens beside it. Each job is the real procedure, step by step, with the mouse as your hands. Slips are counted, and the time and grade show at the end.

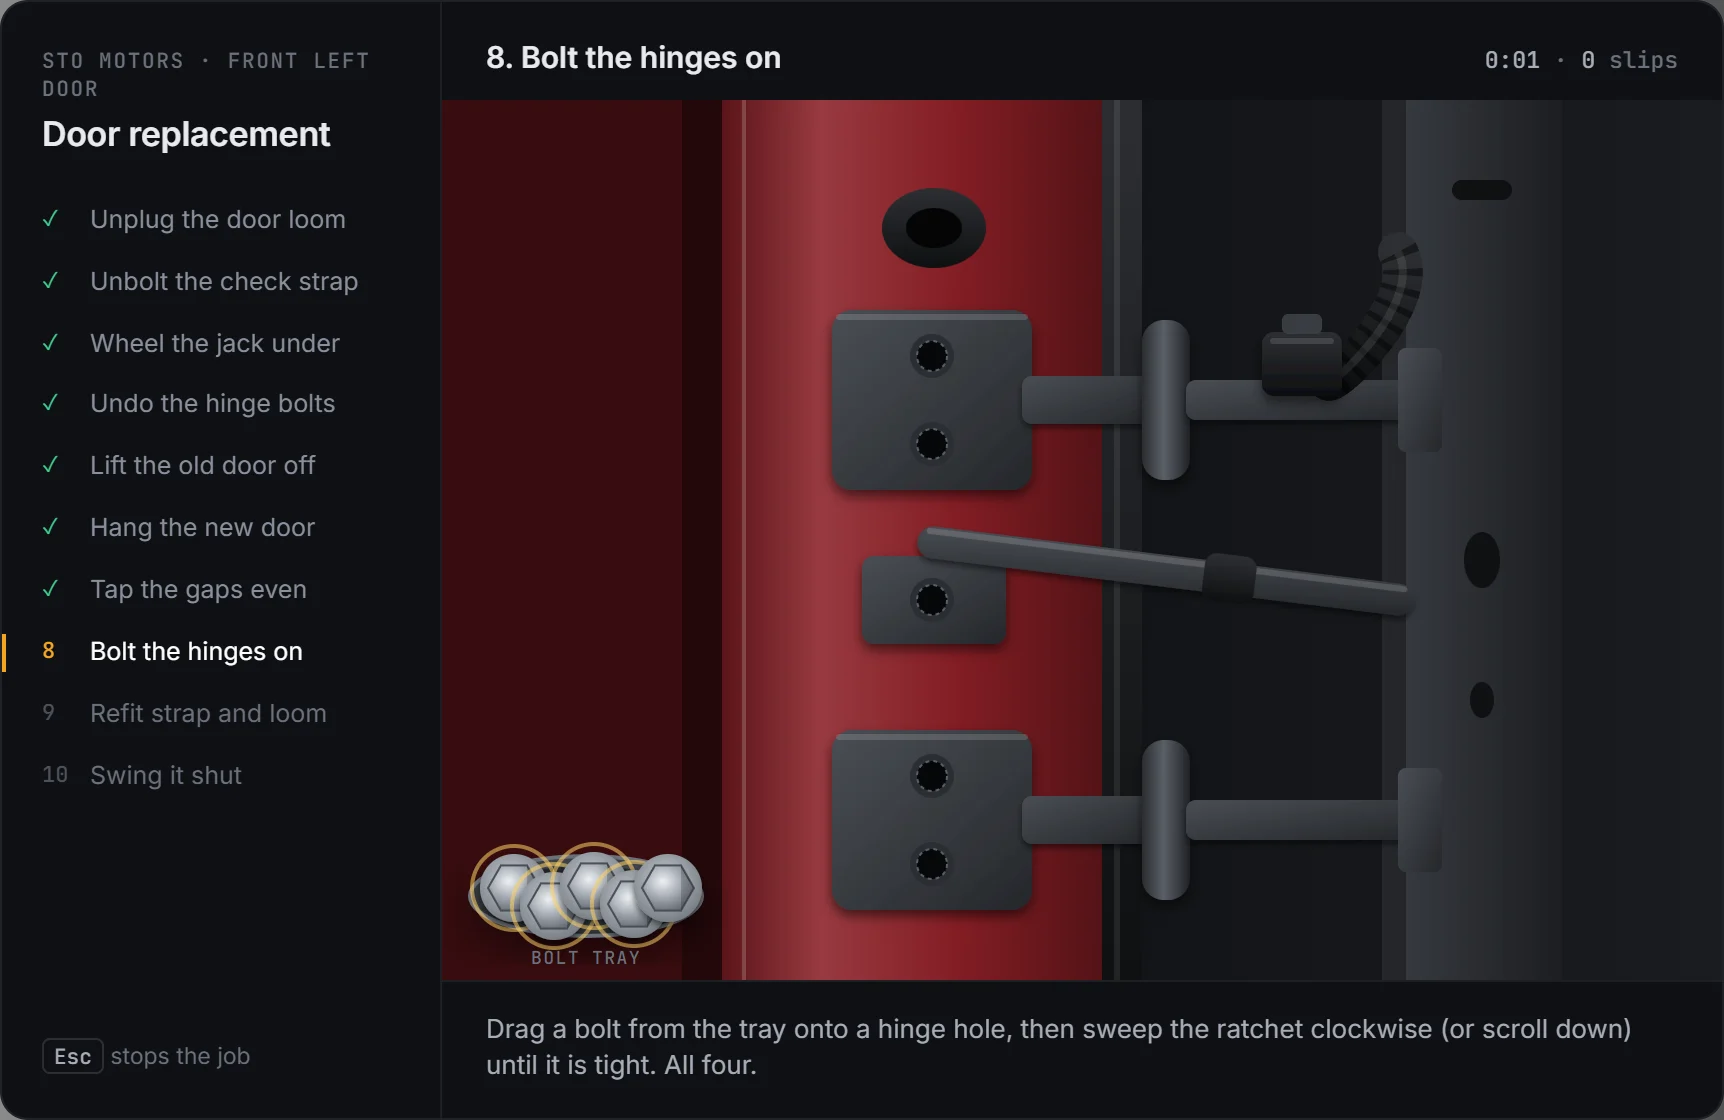
Door job: bolting the hinges on from the bolt tray
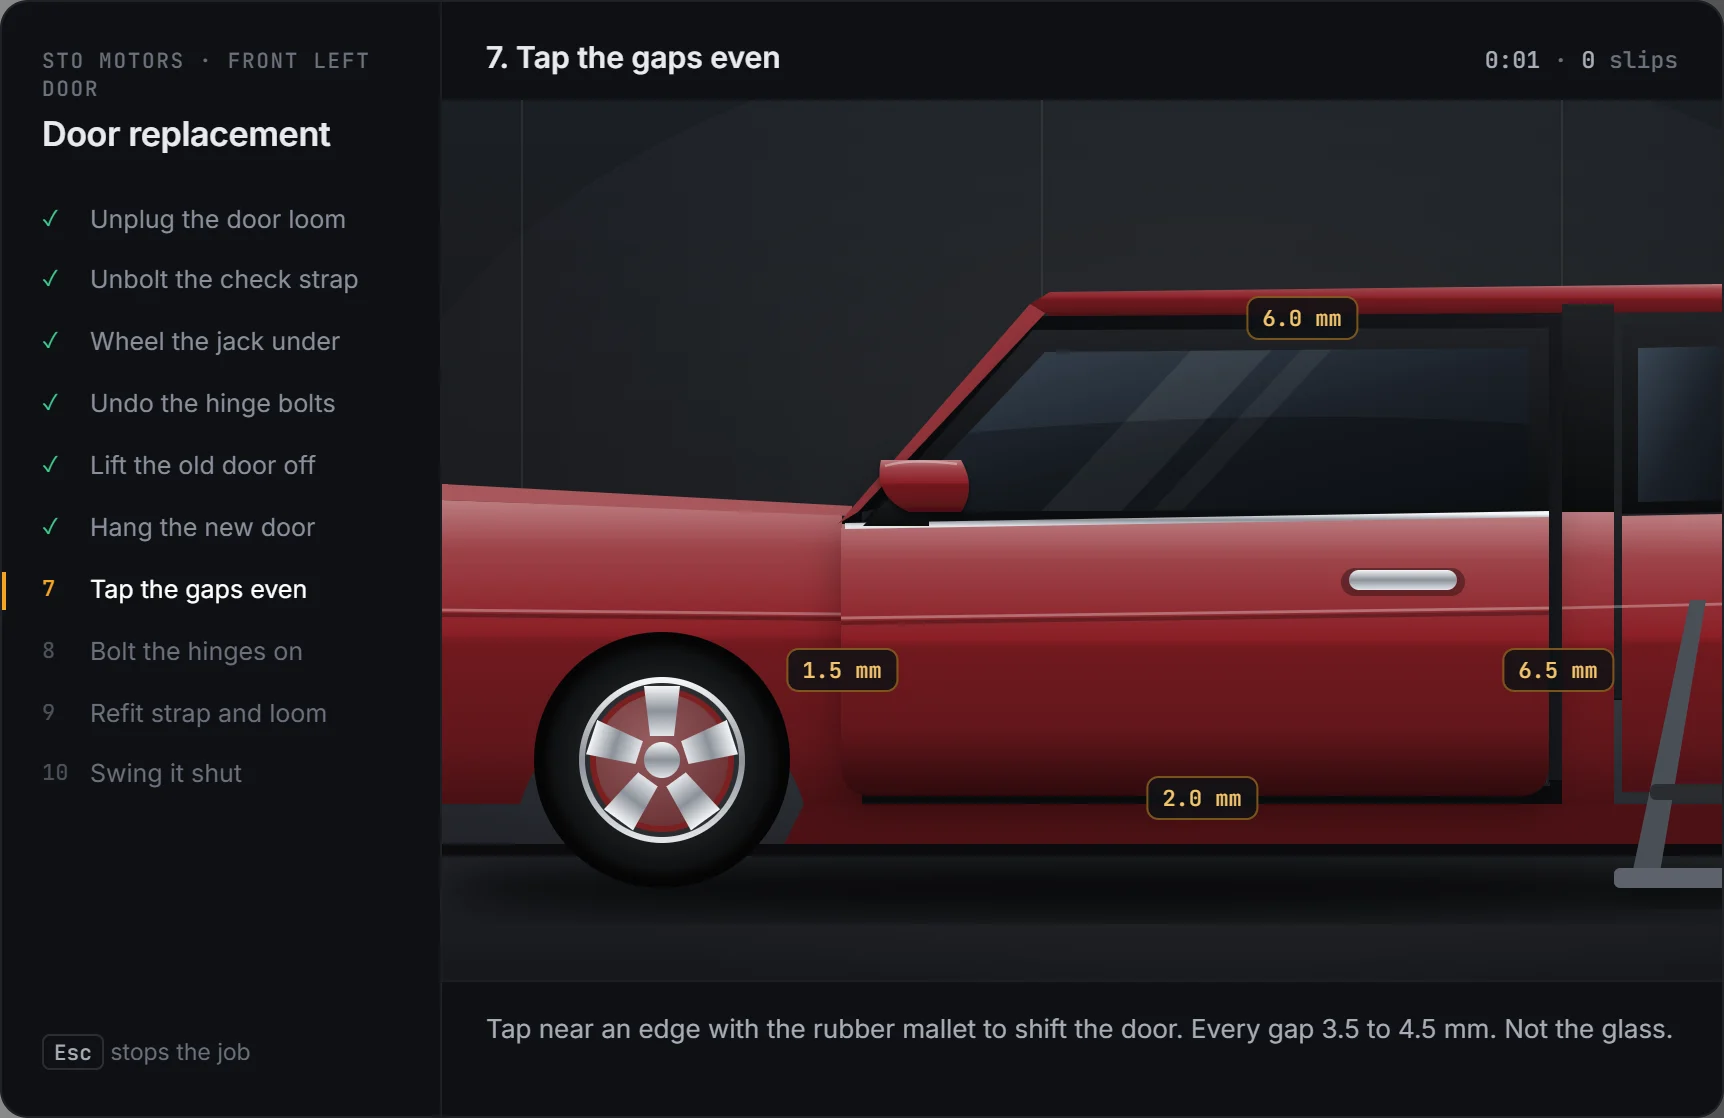
Door job: tapping the panel gaps evenThe door job in game

Door replacement

The damaged door is picked for you. Its bolts go into a tray, and you put any bolt in any hole and ratchet it tight, in any order.

  1. Unplug the door loom
  2. Unbolt the check strap
  3. Wheel the jack under
  4. Undo the four hinge bolts with a ratchet that freewheels on the back stroke
  5. Lift the old door off
  6. Hang the new door
  7. Tap the gaps even with a rubber mallet: 3.5 to 4.5 mm, never the glass
  8. Bolt the hinges on
  9. Refit strap and loom
  10. Swing it shut hard enough to latch
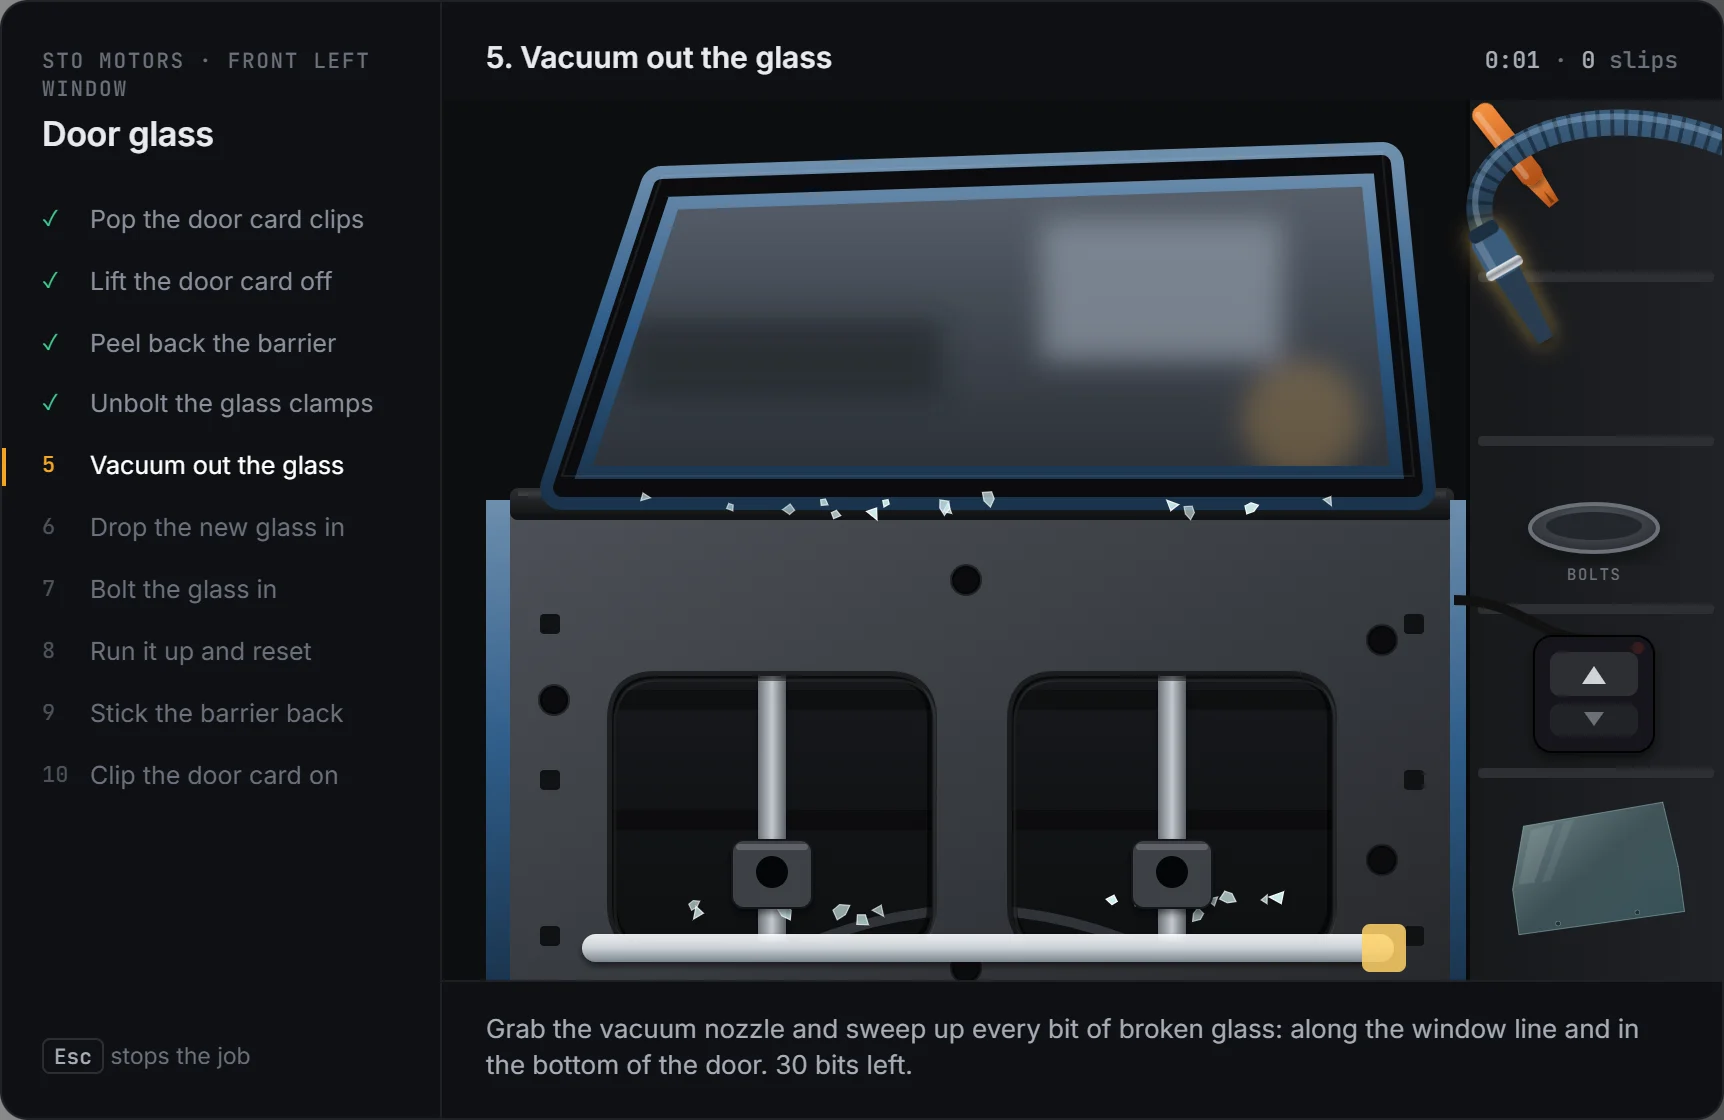
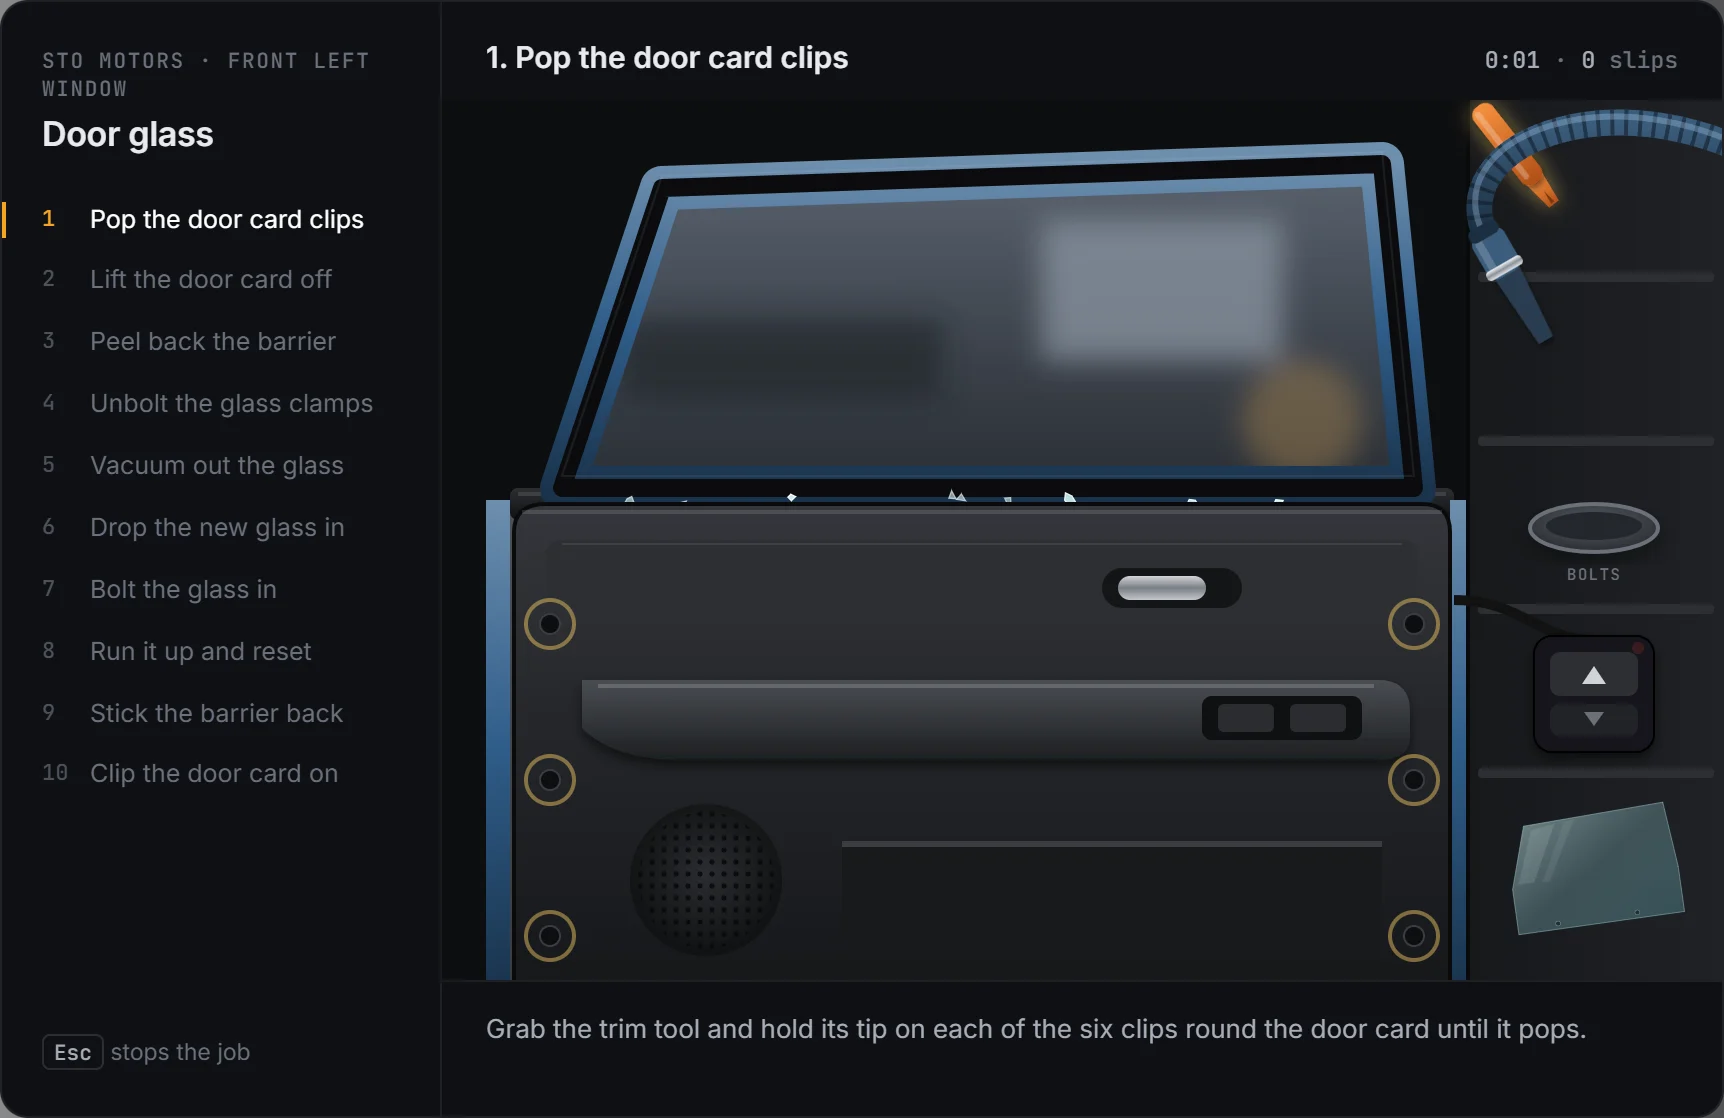
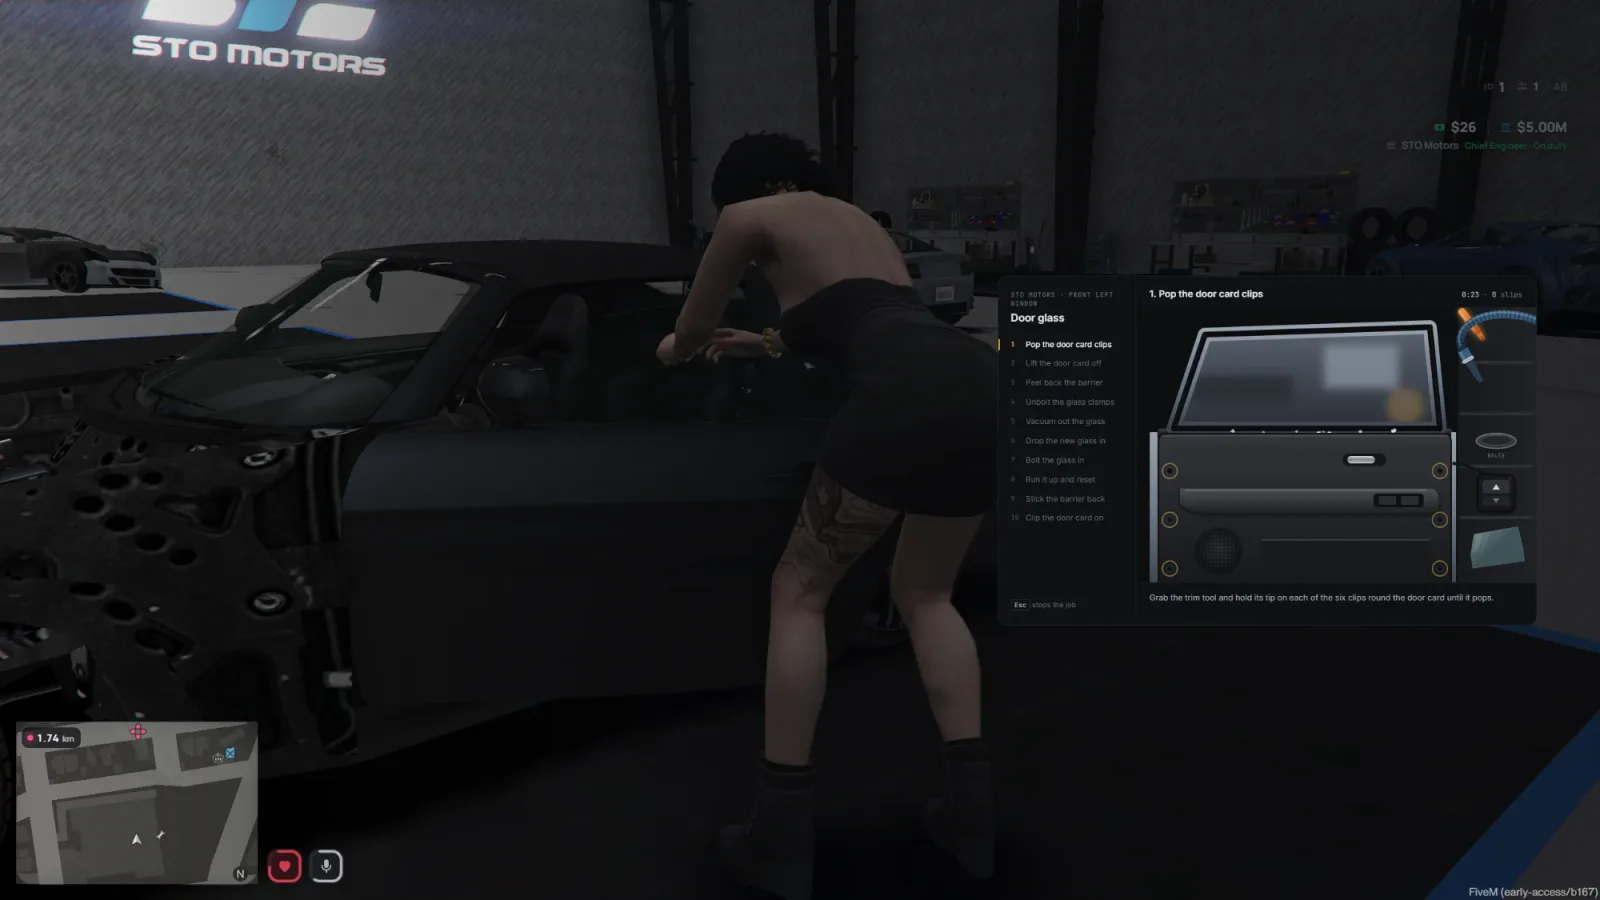
Window job: vacuuming broken glass out of the door
Window job: popping the door card clipsThe window job in game

Door glass

The first broken side window is picked and its door opens. Every shard of the old glass has to come out before the new one goes in.

  1. Pop the six door card clips with the trim tool
  2. Lift the card off its hooks
  3. Peel the barrier back slowly: rip it and it tears
  4. Unbolt the two glass clamps
  5. Vacuum out every shard along the window line and the bottom of the door
  6. Drop the new glass in
  7. Line the holes up, then bolt it
  8. Run it up and hold to reset auto-up
  9. Stick the barrier back
  10. Clip the door card on
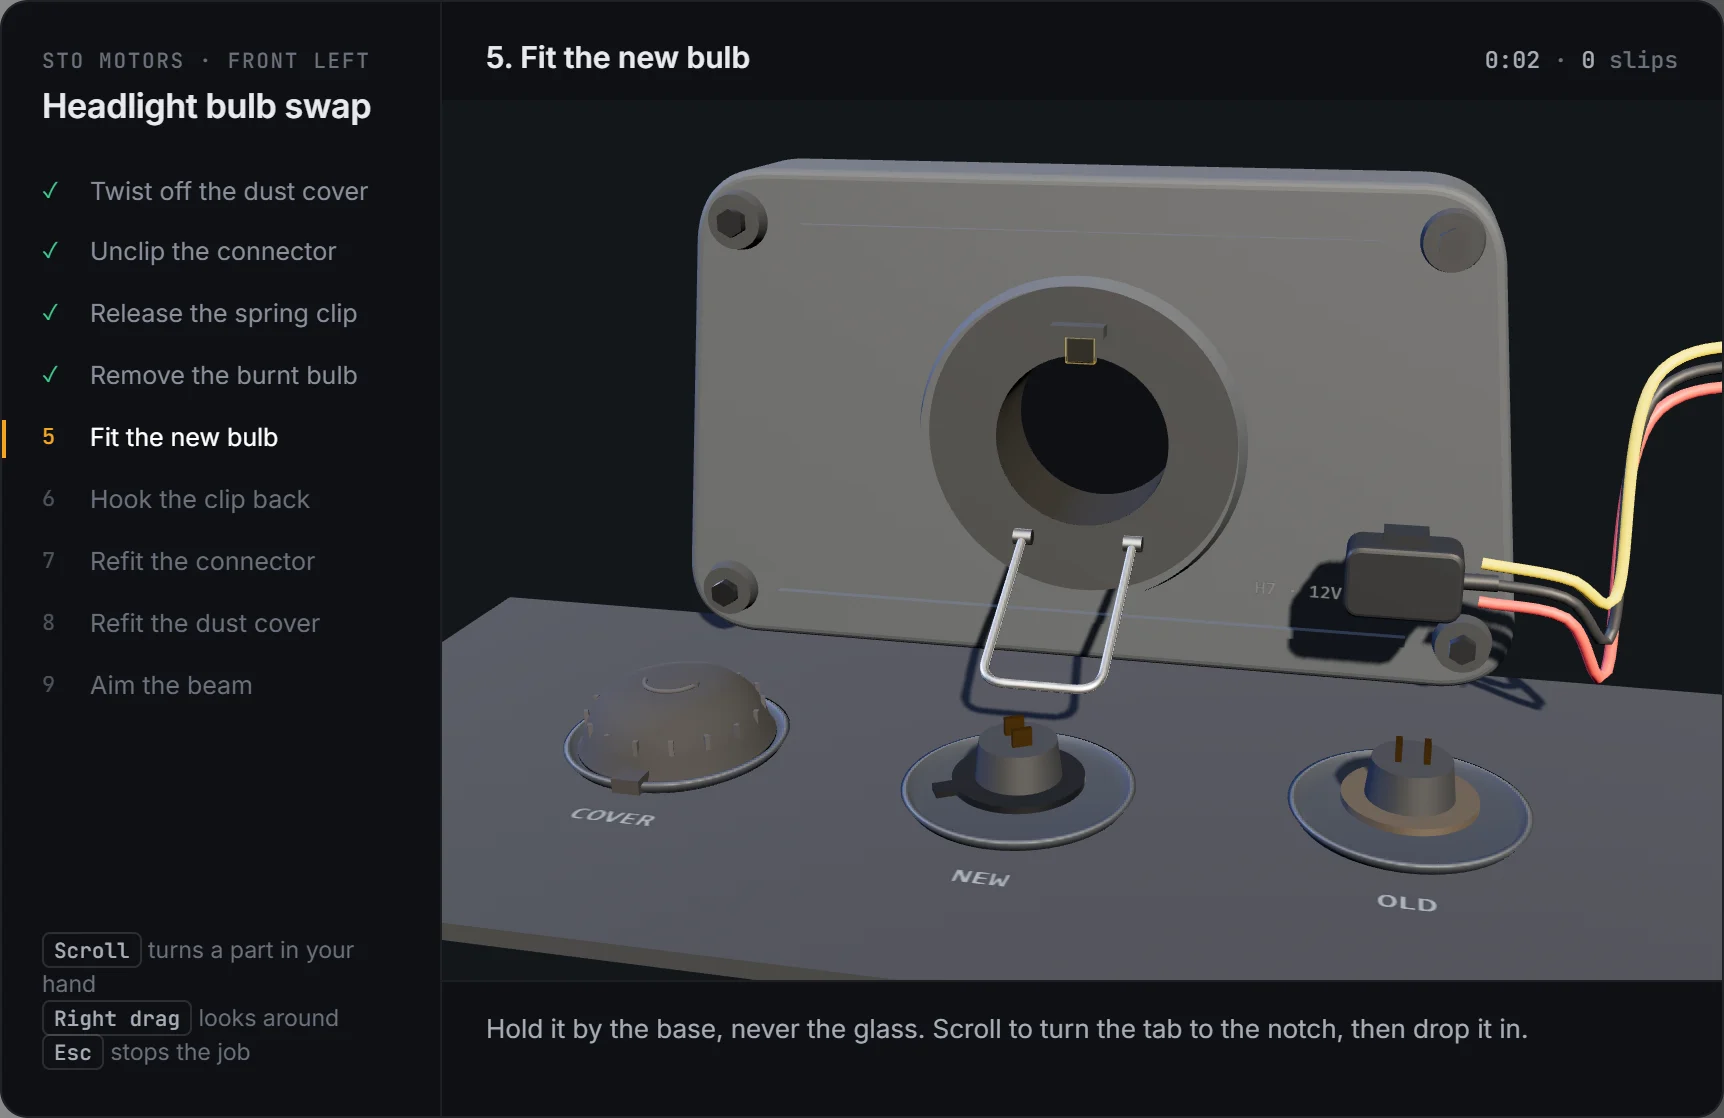
Headlight job in 3D: fitting the new bulb into the housing
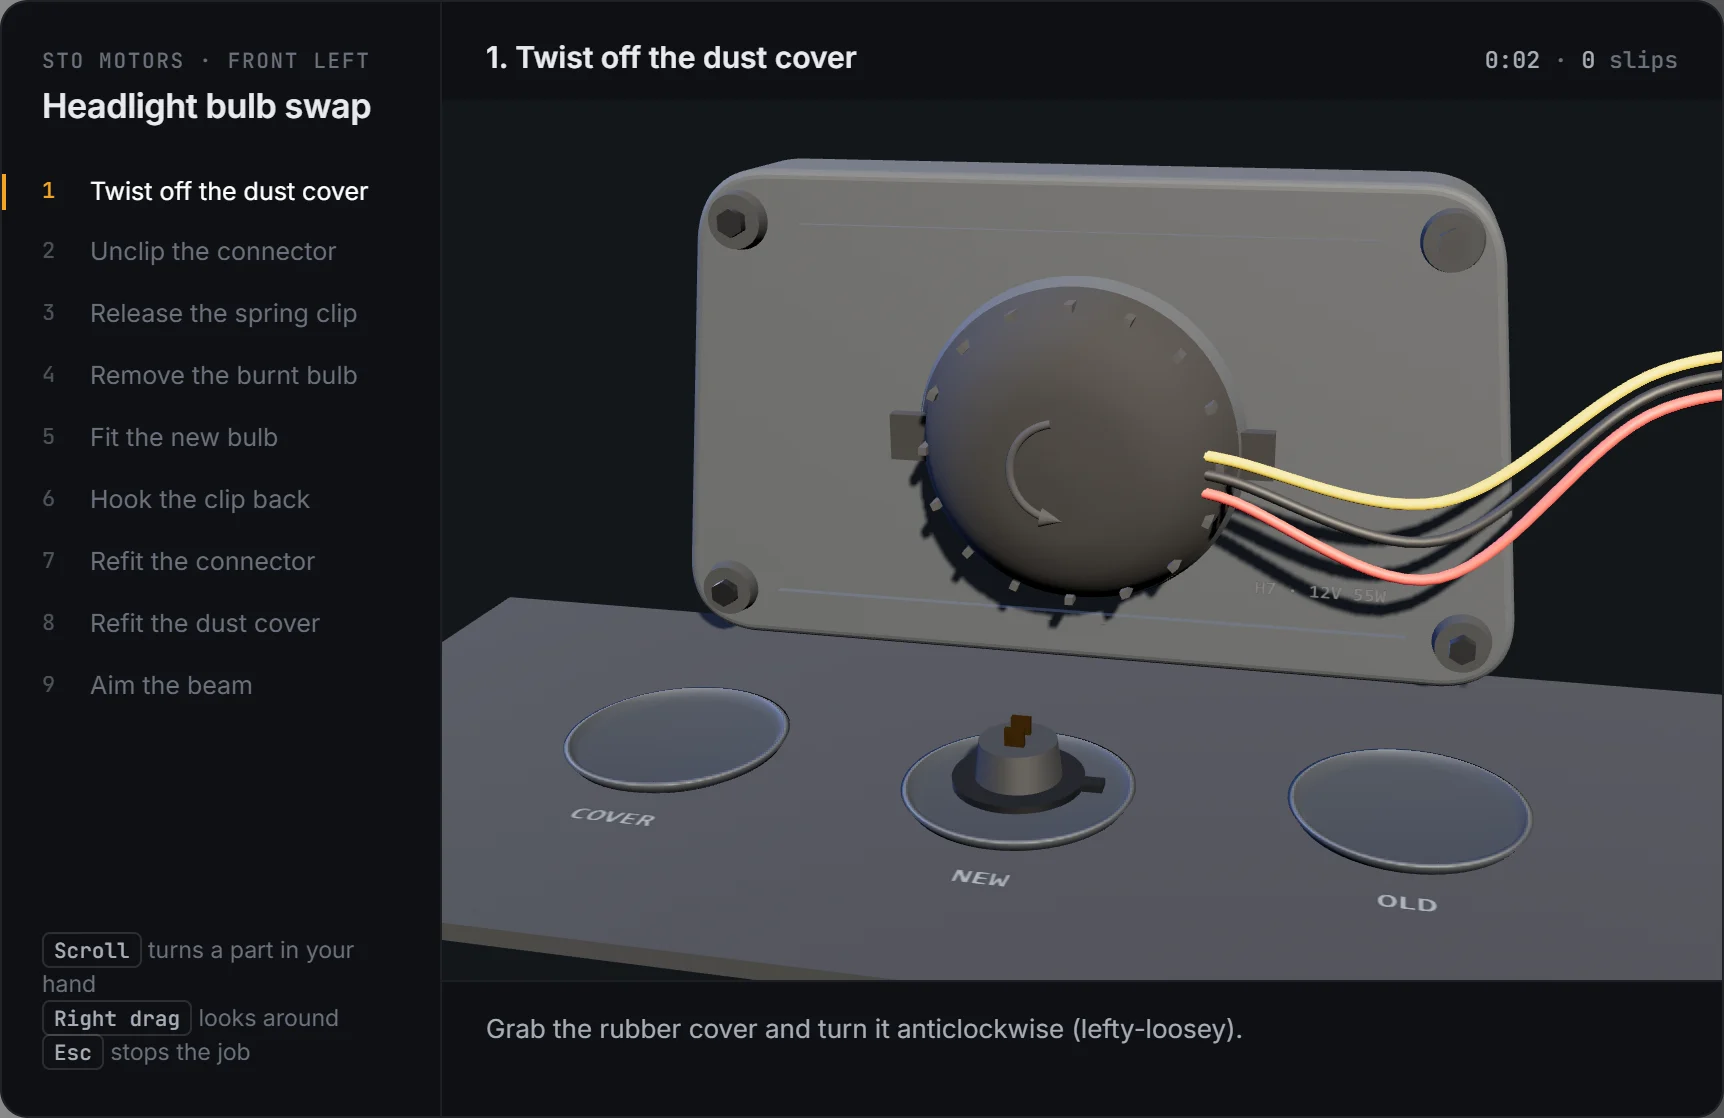
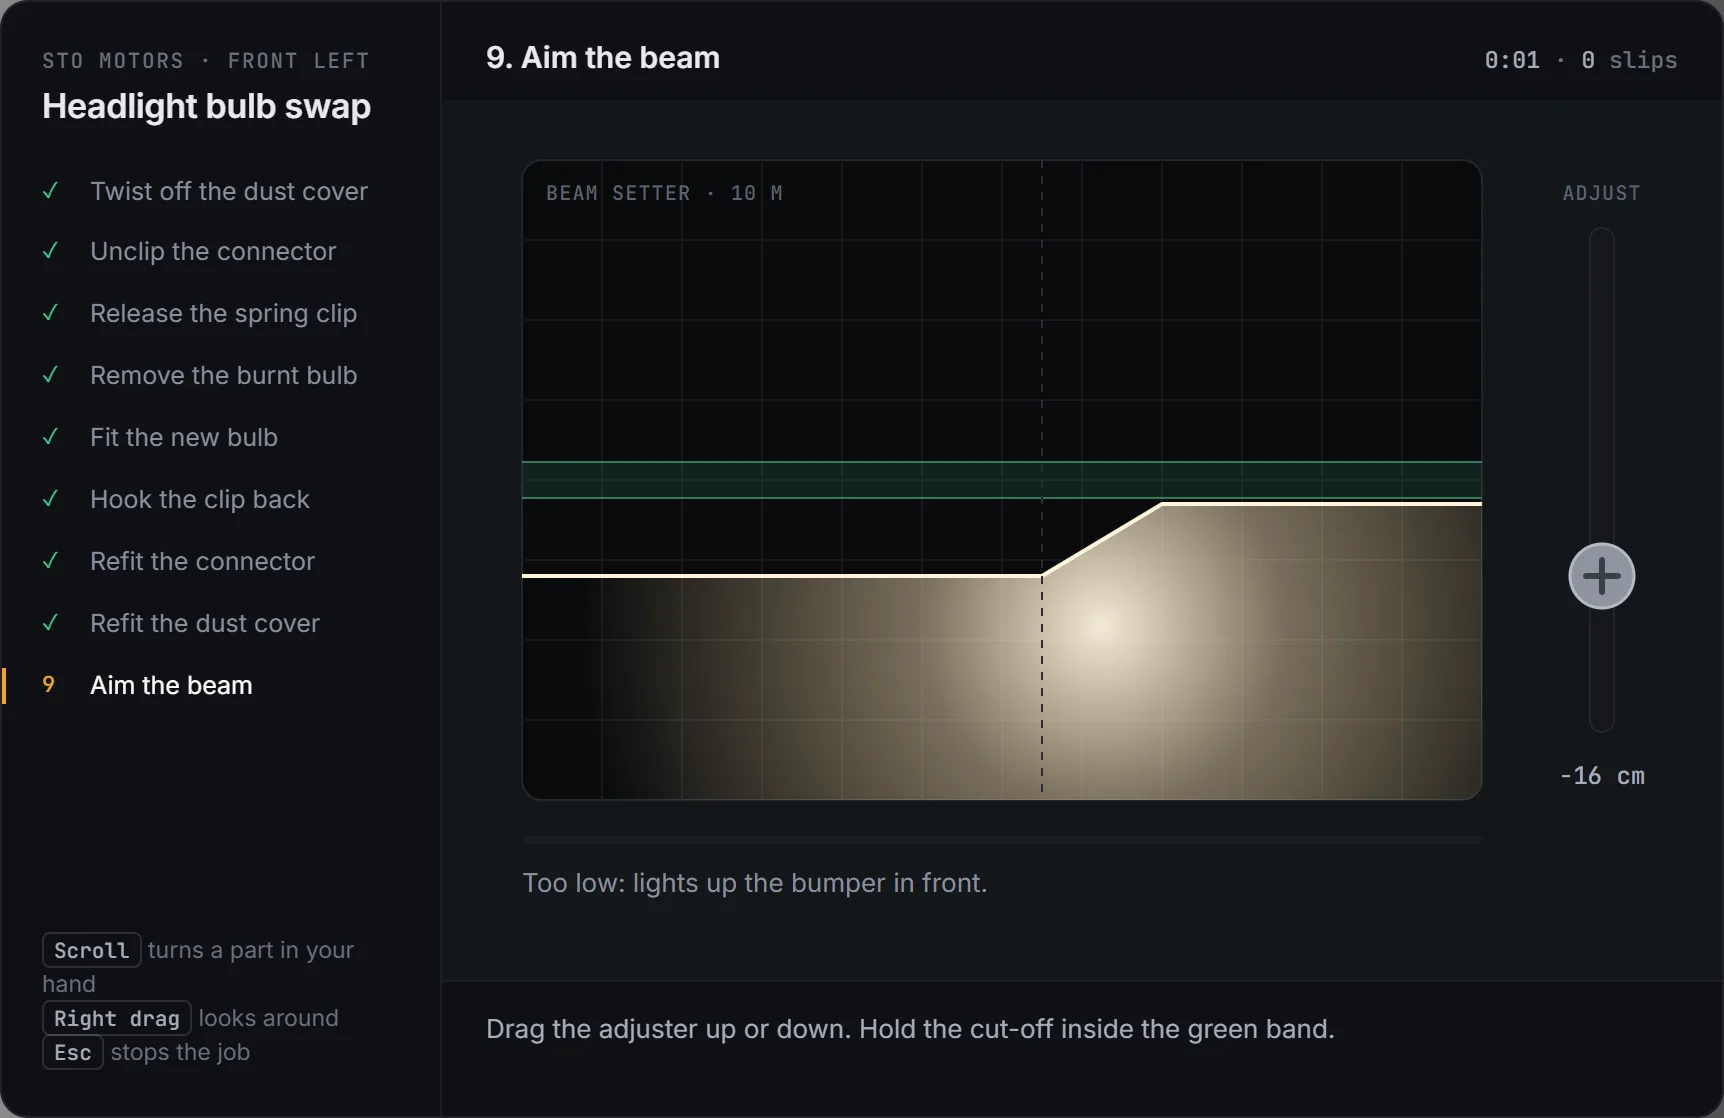
Headlight job: twisting off the dust coverHeadlight job: aiming the beam on the beam setter

Headlight bulb swap

A real-time 3D housing you can look around with the right mouse button. Hold the new bulb by its base, never the glass.

  1. Twist off the dust cover, anticlockwise
  2. Squeeze the connector tab until it lets go
  3. Release the spring clip
  4. Drop the burnt bulb in the old parts tray
  5. Scroll to turn the locating tab to the notch, then seat the bulb
  6. Hook the clip back
  7. Refit the connector
  8. Refit the dust cover, clockwise
  9. Aim the beam: hold the cut-off inside the green band
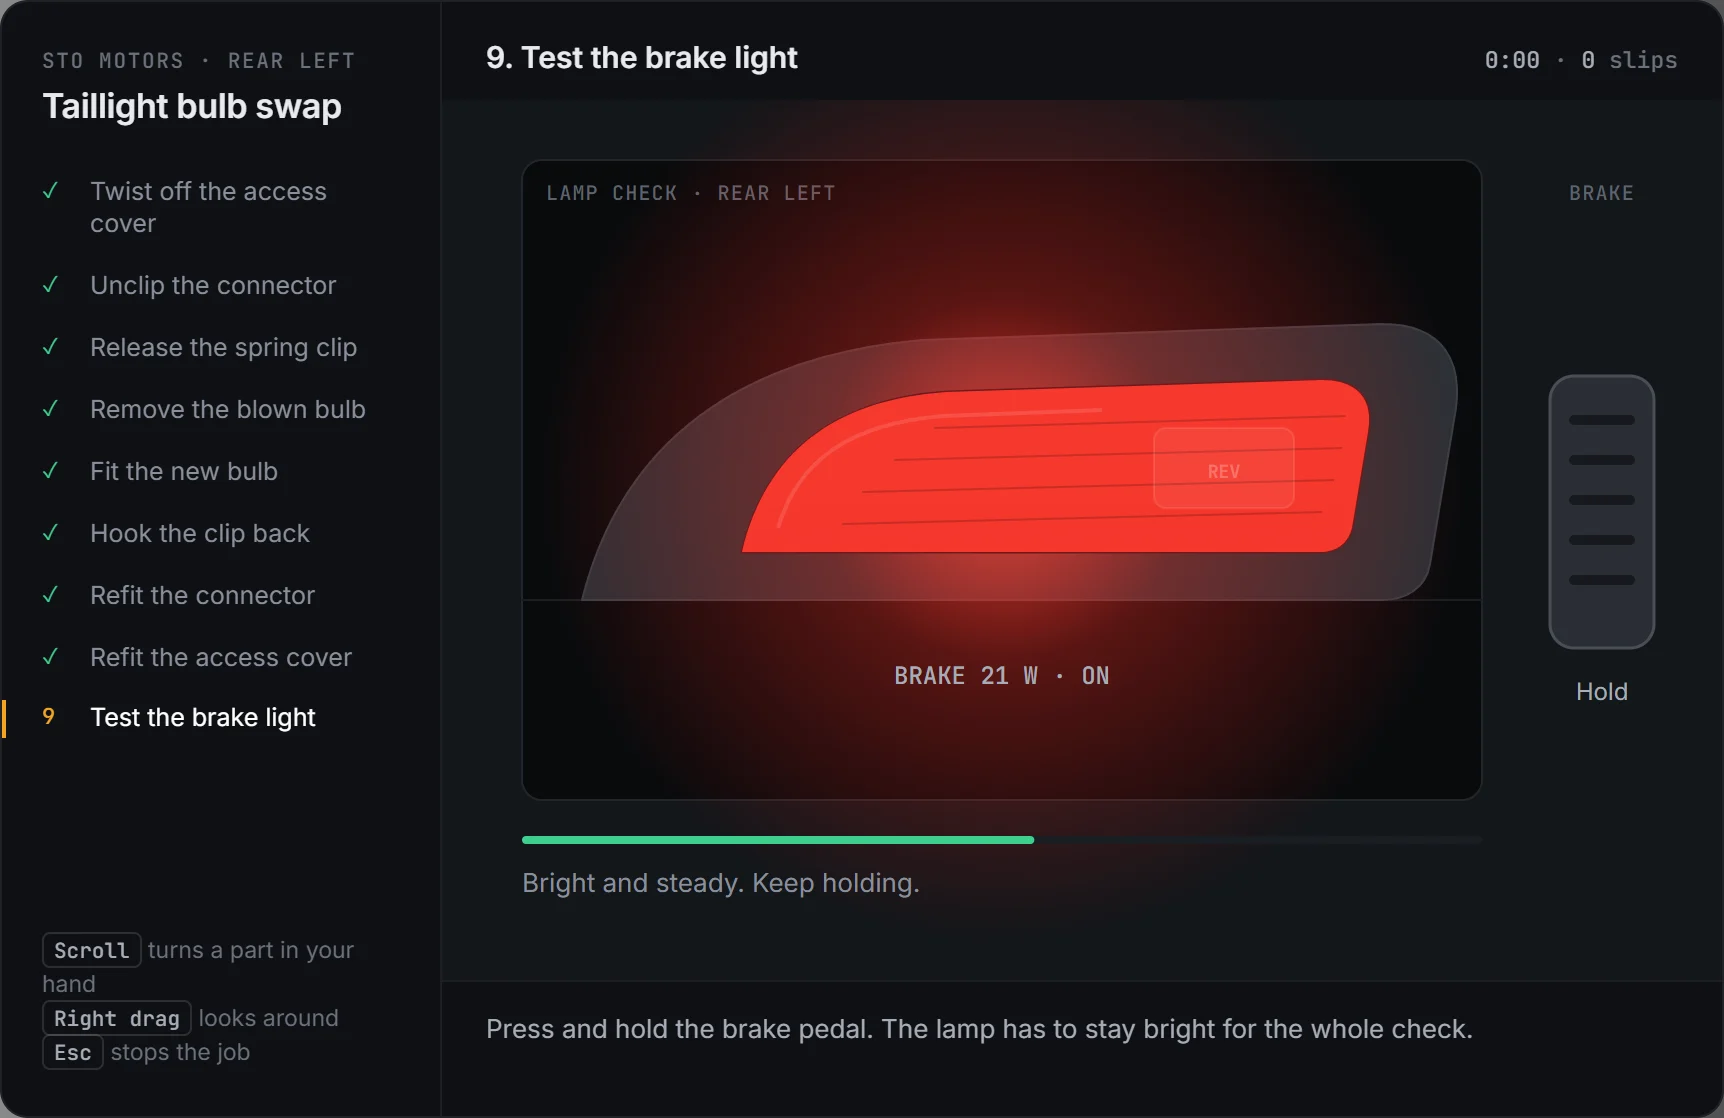
Taillight job: the brake light test with the lamp lit red
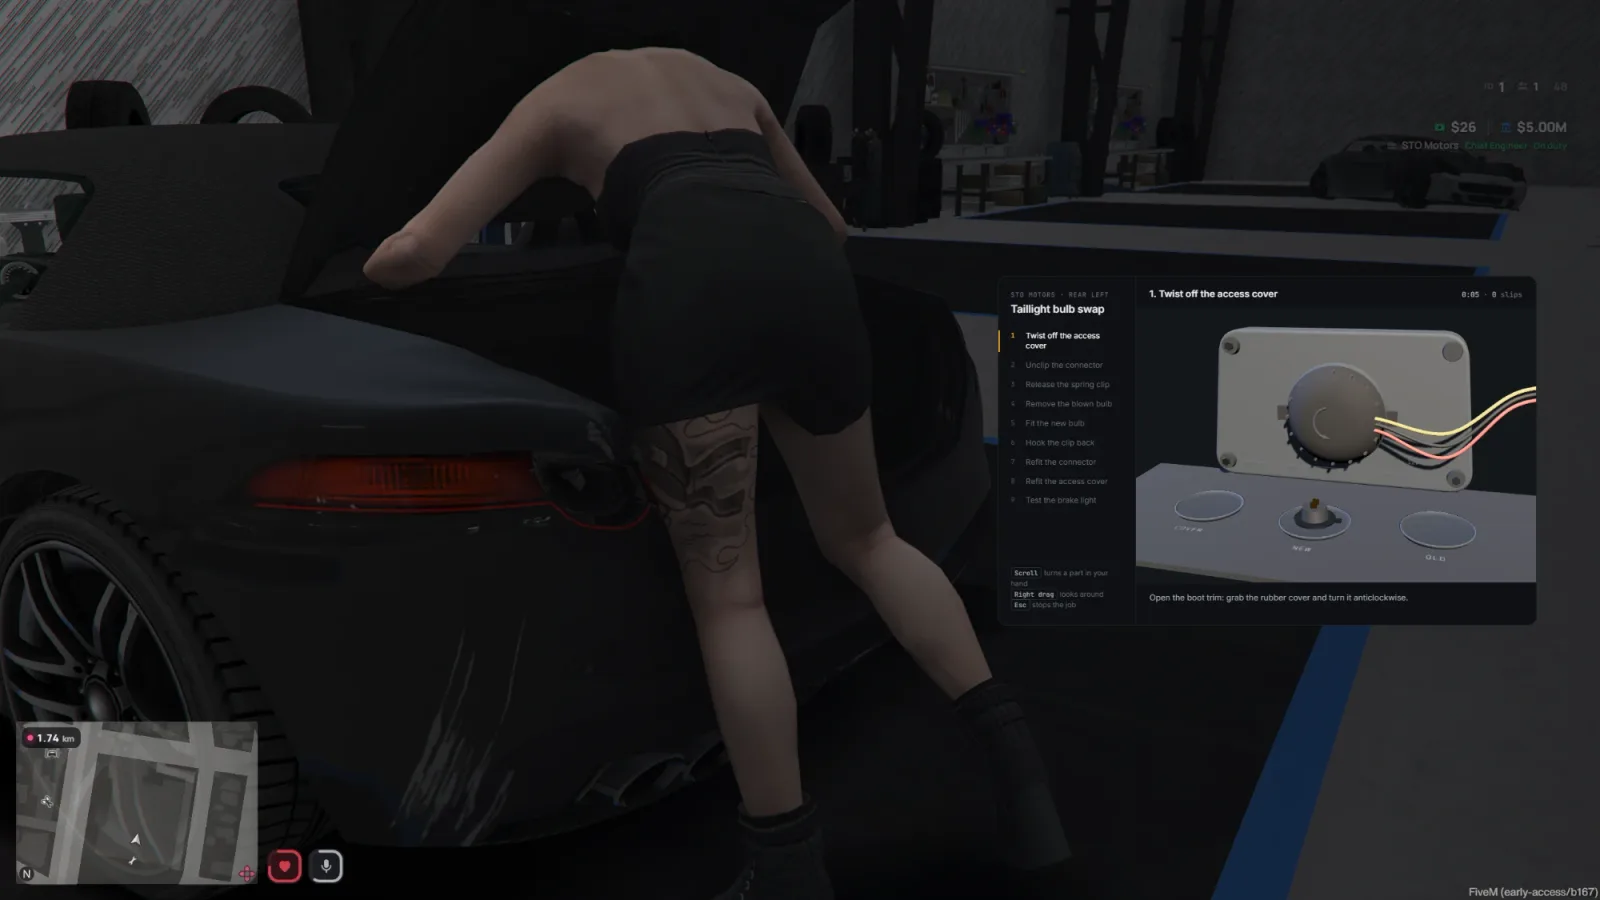
The taillight job in game, from inside the bootThe 3D lamp housing

Taillight bulb swap

The same hands-on swap on the rear lamp, done from inside the open boot, with a dual-filament bulb whose pins only go one way.

  1. Twist off the access cover
  2. Unclip the connector
  3. Release the spring clip
  4. Remove the blown bulb
  5. Fit the new bulb, tab to the notch
  6. Hook the clip back
  7. Refit the connector
  8. Refit the access cover
  9. Test the brake light: hold the pedal, the 21 W filament must stay bright
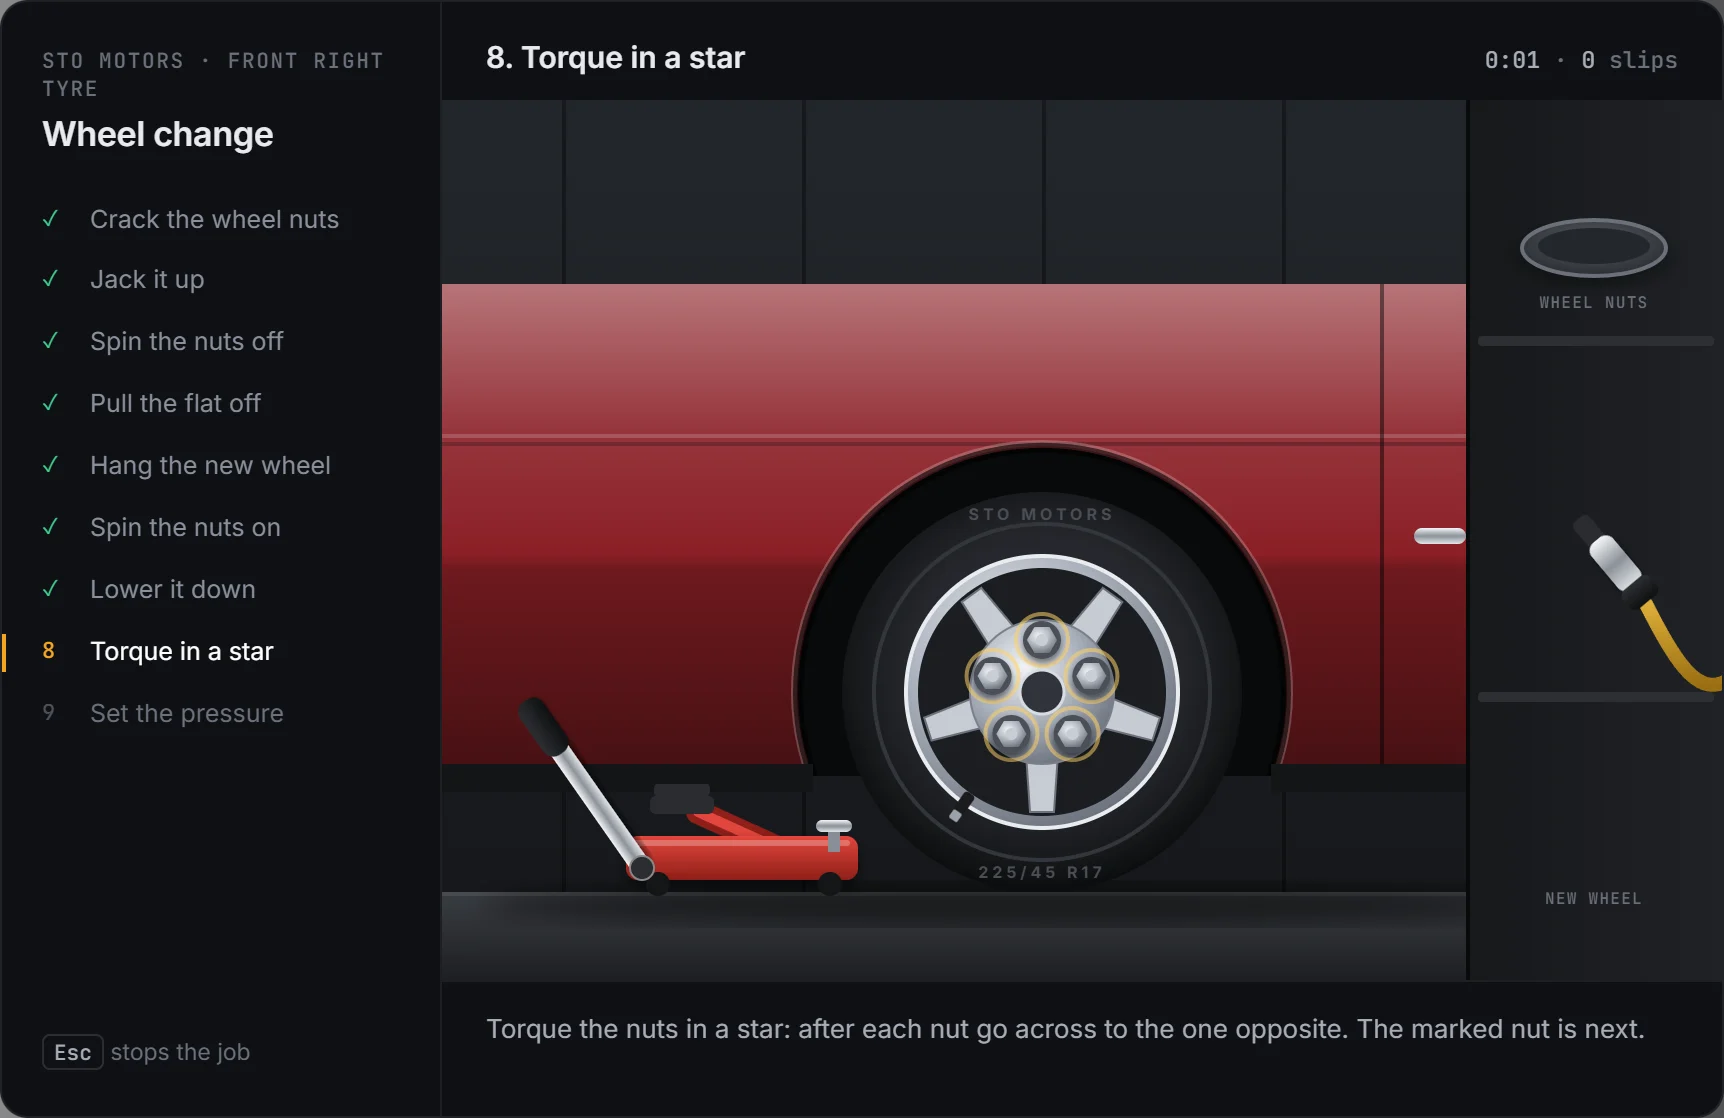
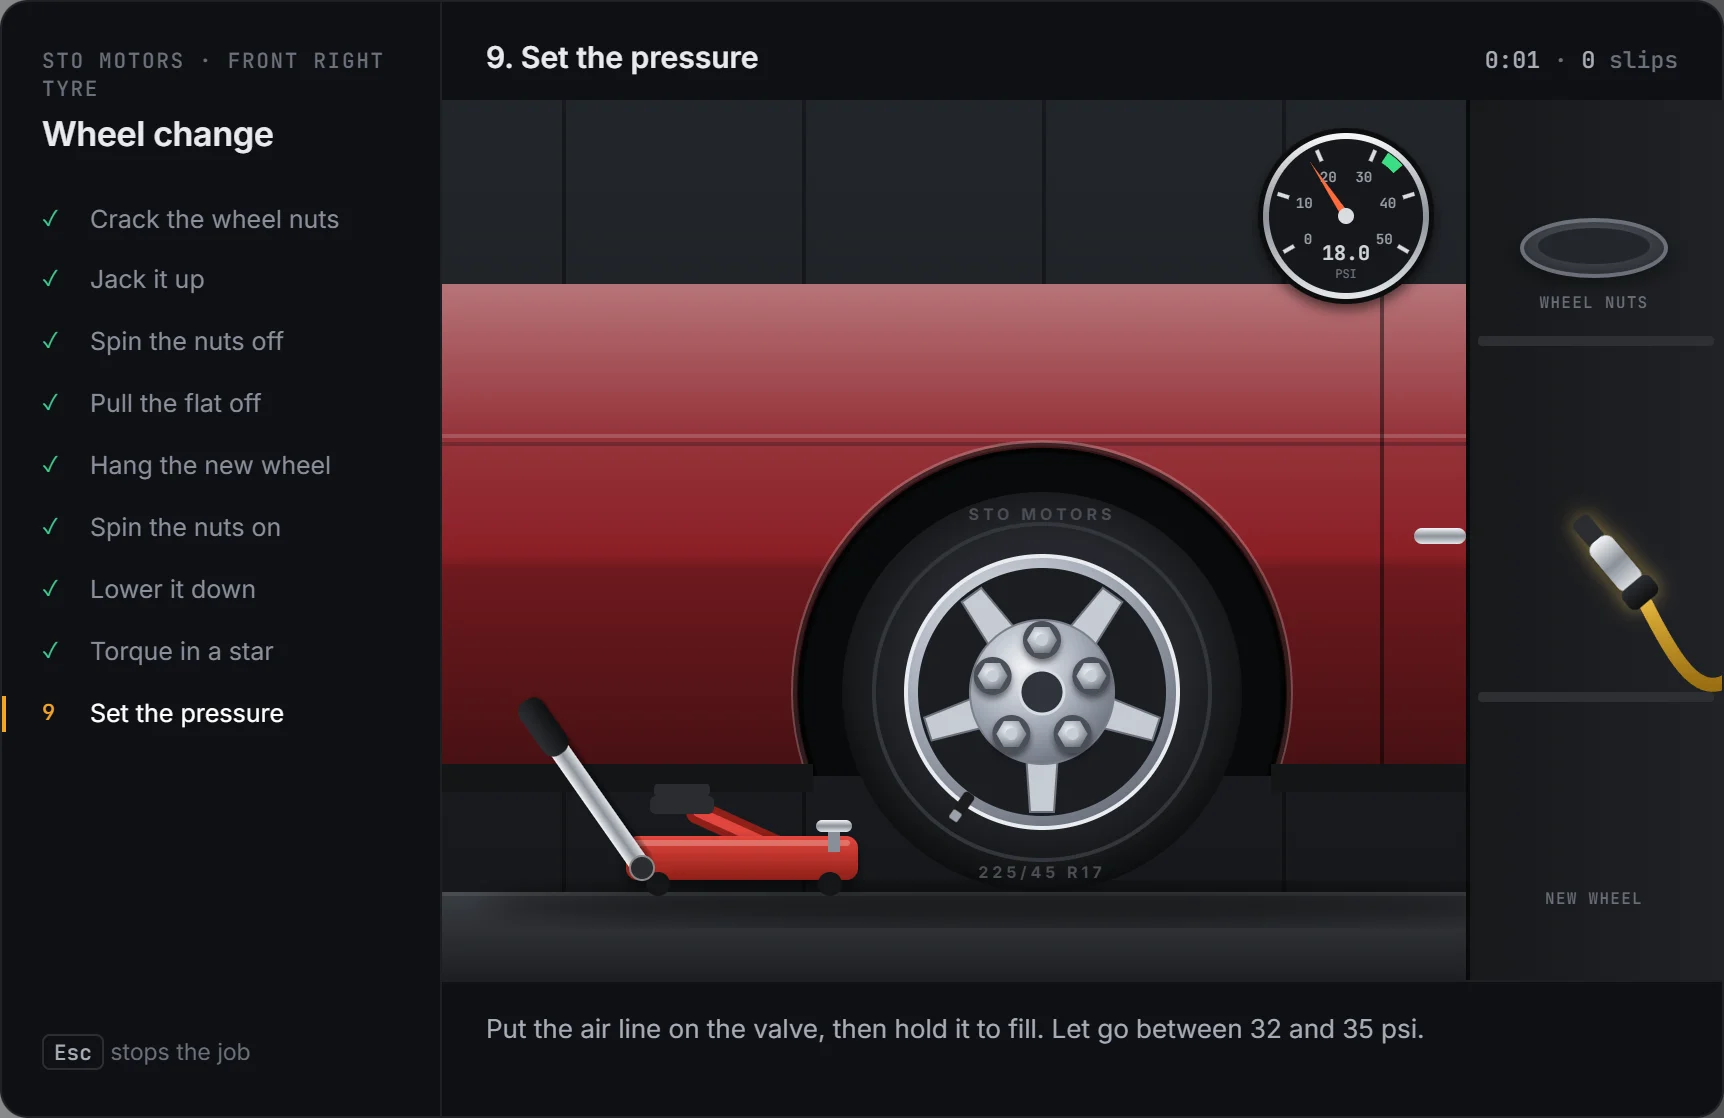
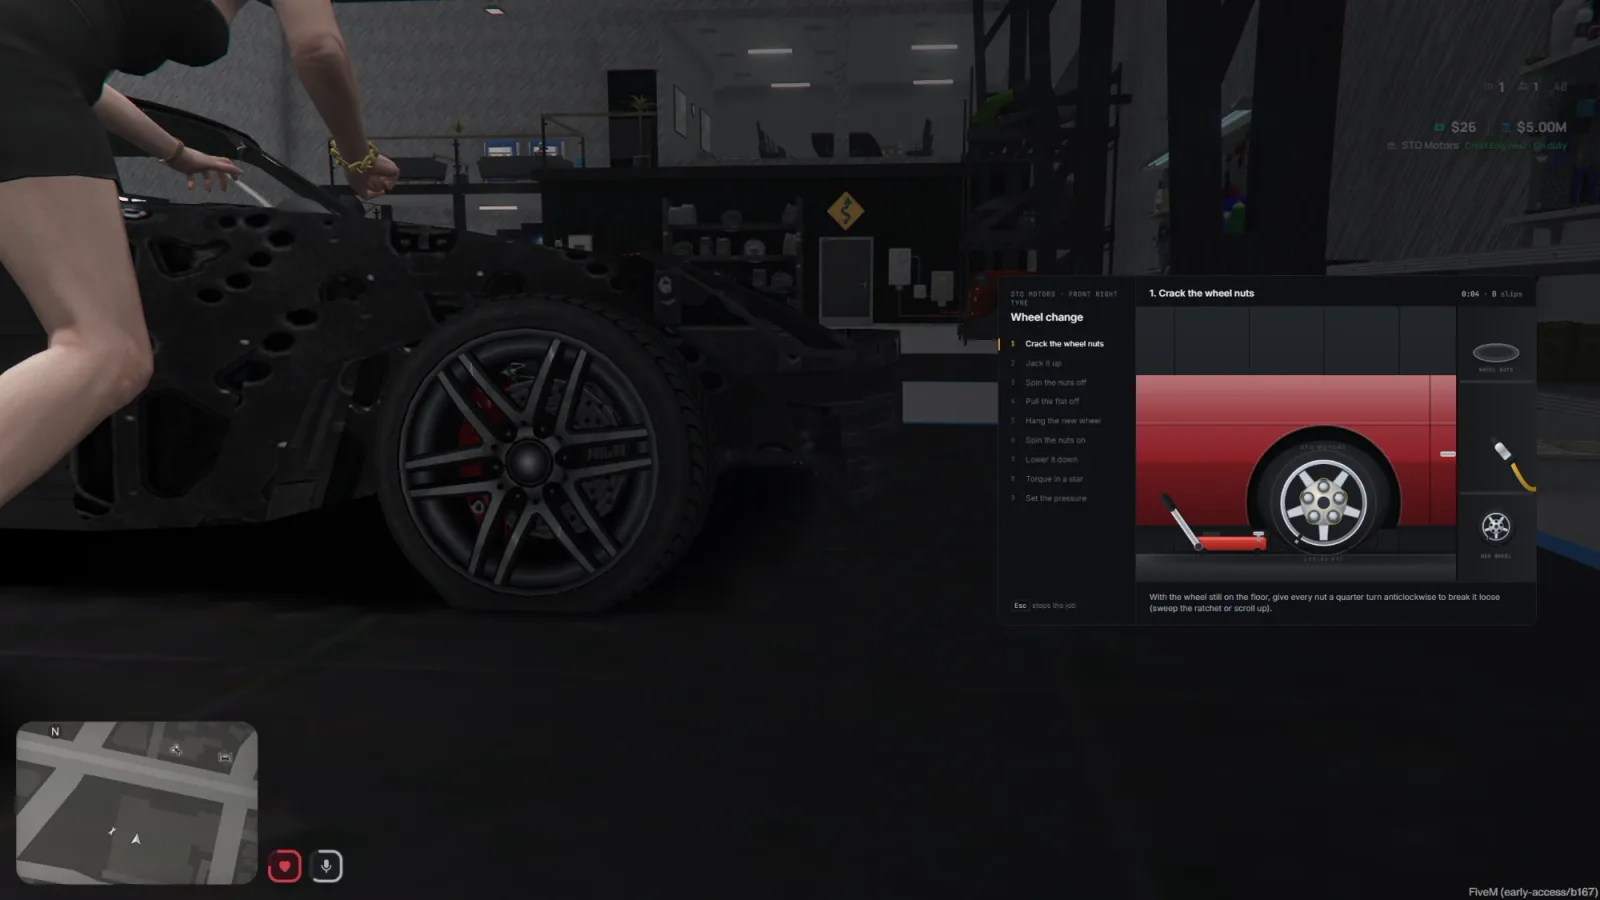
Tyre job: torquing the wheel nuts in a star
Tyre job: setting the pressure with the air chuckThe tyre job in game

Wheel change

The wheel reads which tyres are flat. Each flat is its own job, and the camera frames that wheel.

  1. Crack the nuts while the wheel is on the floor
  2. Pump the jack handle to lift the car
  3. Spin the nuts off
  4. Pull the flat off
  5. Hang the new wheel and turn it till the holes meet the studs
  6. Spin the nuts on
  7. Hold the release knob to lower it
  8. Torque in a star: across to the opposite nut each time
  9. Set the pressure: let go between 32 and 35 psi

Feel

Details a mechanic would notice

A ratchet that freewheels

Sweep the handle the way it tightens. The back stroke clicks freely, progress is kept when you let go, and the scroll wheel turns it too.

Any bolt, any hole

Bolts come out into a tray. Drop any bolt in any free hole and tighten them in whatever order you like.

Star torque

Wheel nuts are torqued across the hub. Skip the pattern and it counts as a slip, just like a real tyre fitter would tell you.

Gauges that matter

Fill a tyre to 32–35 psi, oil to the MAX line, gaps to 3.5–4.5 mm, a beam into its band. Too far is a slip.

Slips and a grade

Wrong part, wrong way, early release or a mallet on the glass is a slip. Every job ends with your time and a grade.

Animations that match

Lean into the bay, ratchet with a wrench in hand, carry a box-heavy battery, tip the oil. The character acts out each kind of step.

Workbench

Every part is made

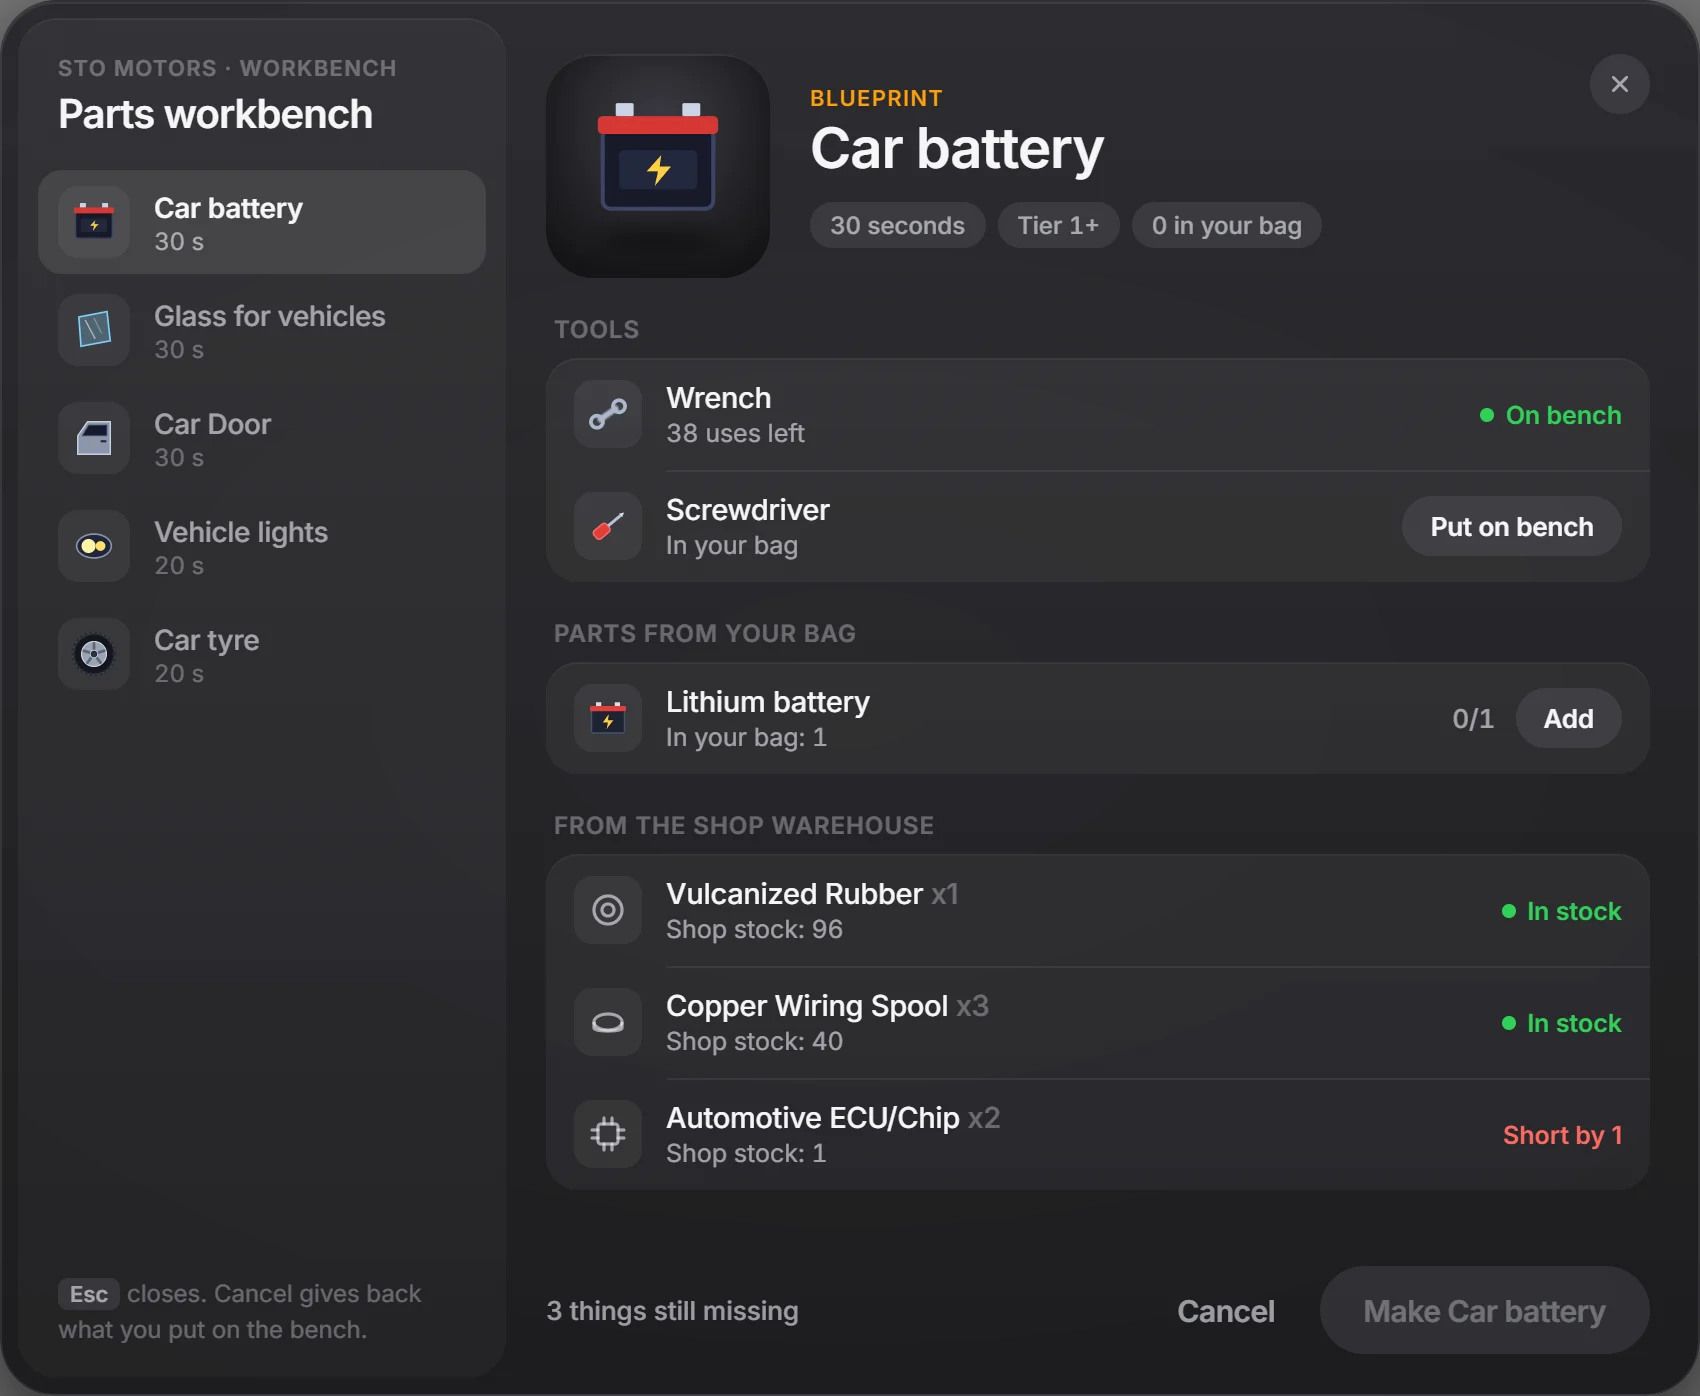
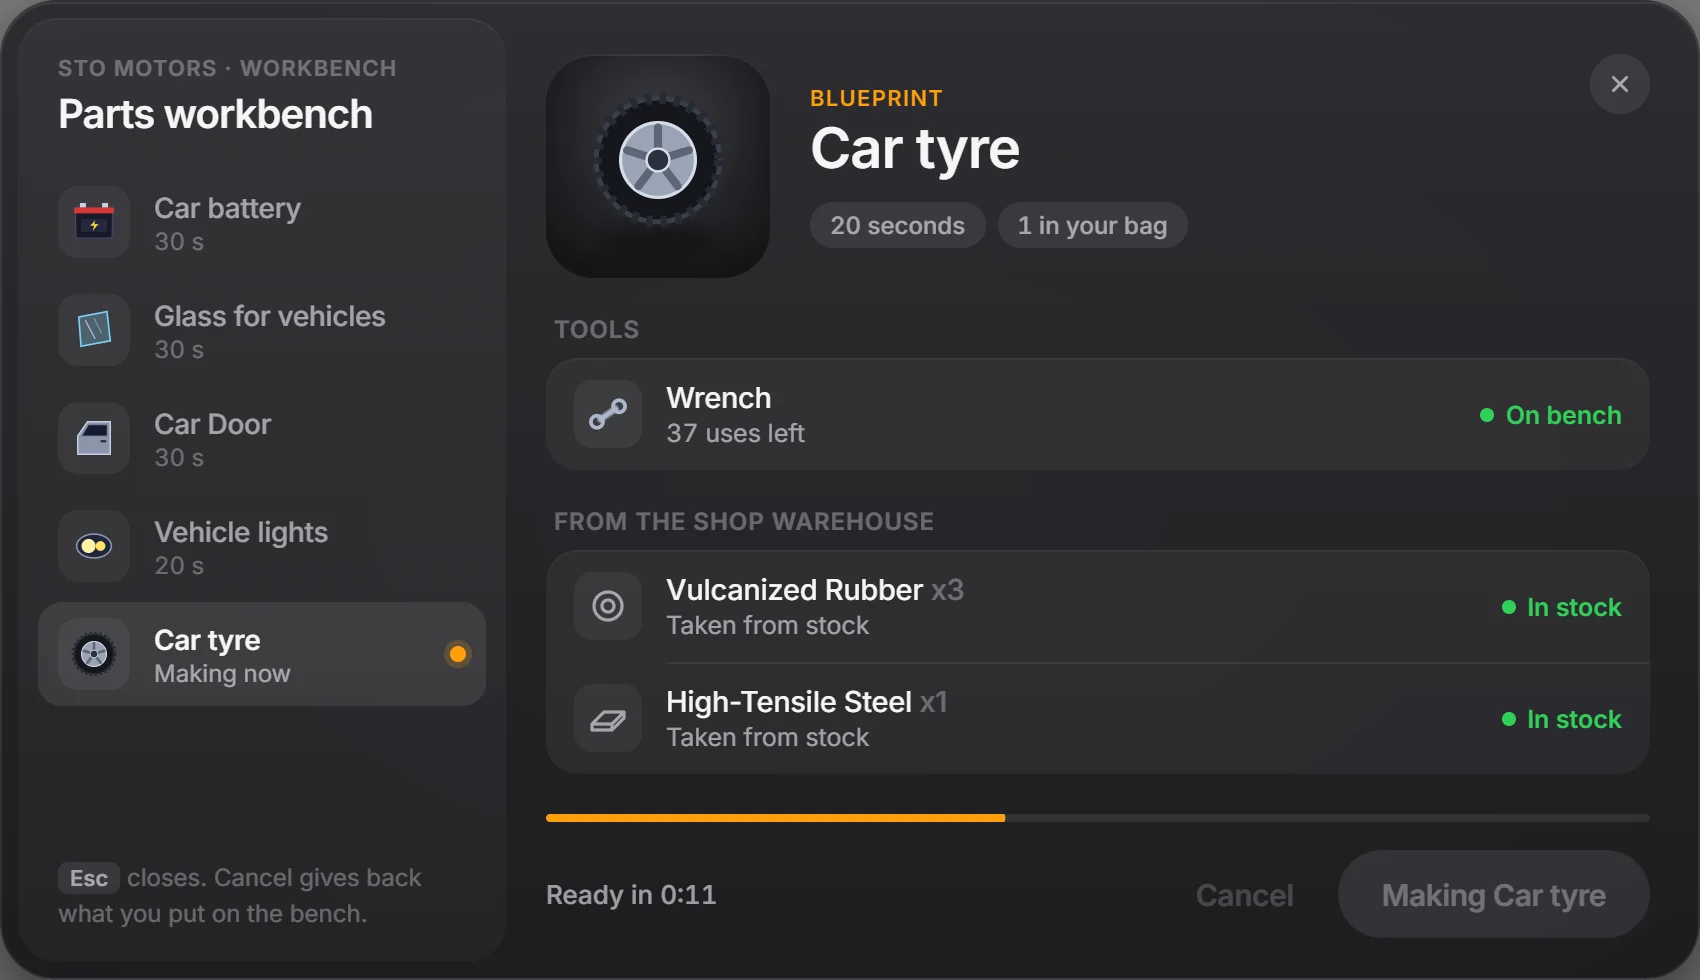
One parts workbench makes all five parts. Put your own tools on the bench, add parts from your bag, and the raw materials come out of the shop warehouse. Your character works at the bench for the time shown, with the tool in hand. Step away and the job keeps running.

PartTimeToolsMaterials
Car battery30 sWrench, screwdriver + a lithium batteryCopper 3 · ECU 2 · rubber 1
Glass for vehicles30 sHammer, glass cutter, screwdriverGlass 3 · rubber 1
Car door30 sWrench, hammer, screwdriverSteel 5 · aluminium 3 · glass 1
Vehicle lights20 sScrewdriver, flashlightGlass 2 · ECU 1 · copper 1
Car tyre20 sWrenchRubber 3 · steel 1
The parts workbench: tools, parts from your bag and shop warehouse stock for a car battery The workbench while a part is being made Making a tyre at the workbench in game

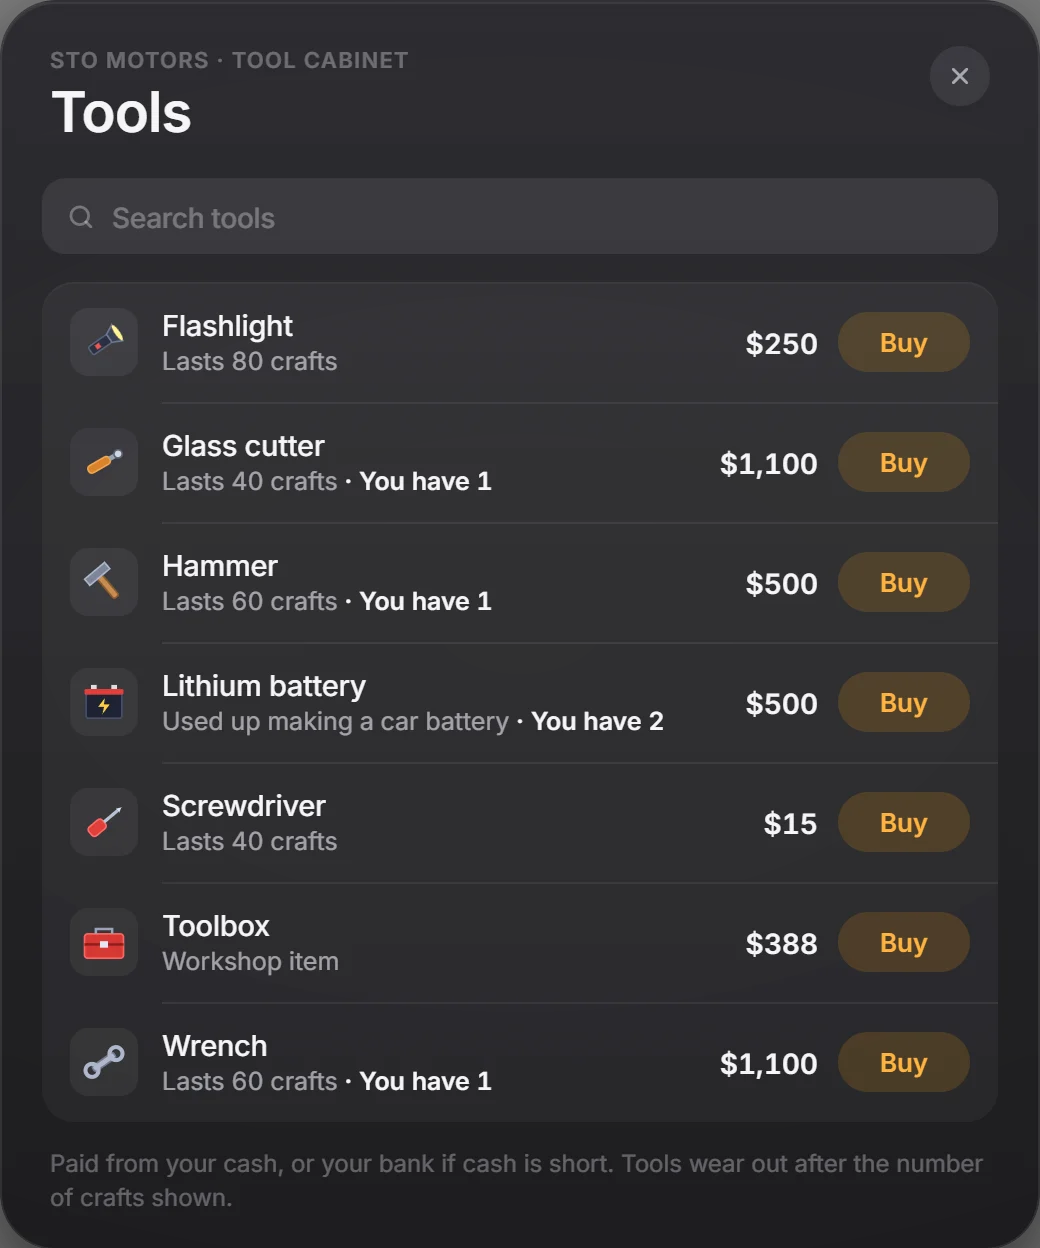
Tool cabinet

Tools wear out

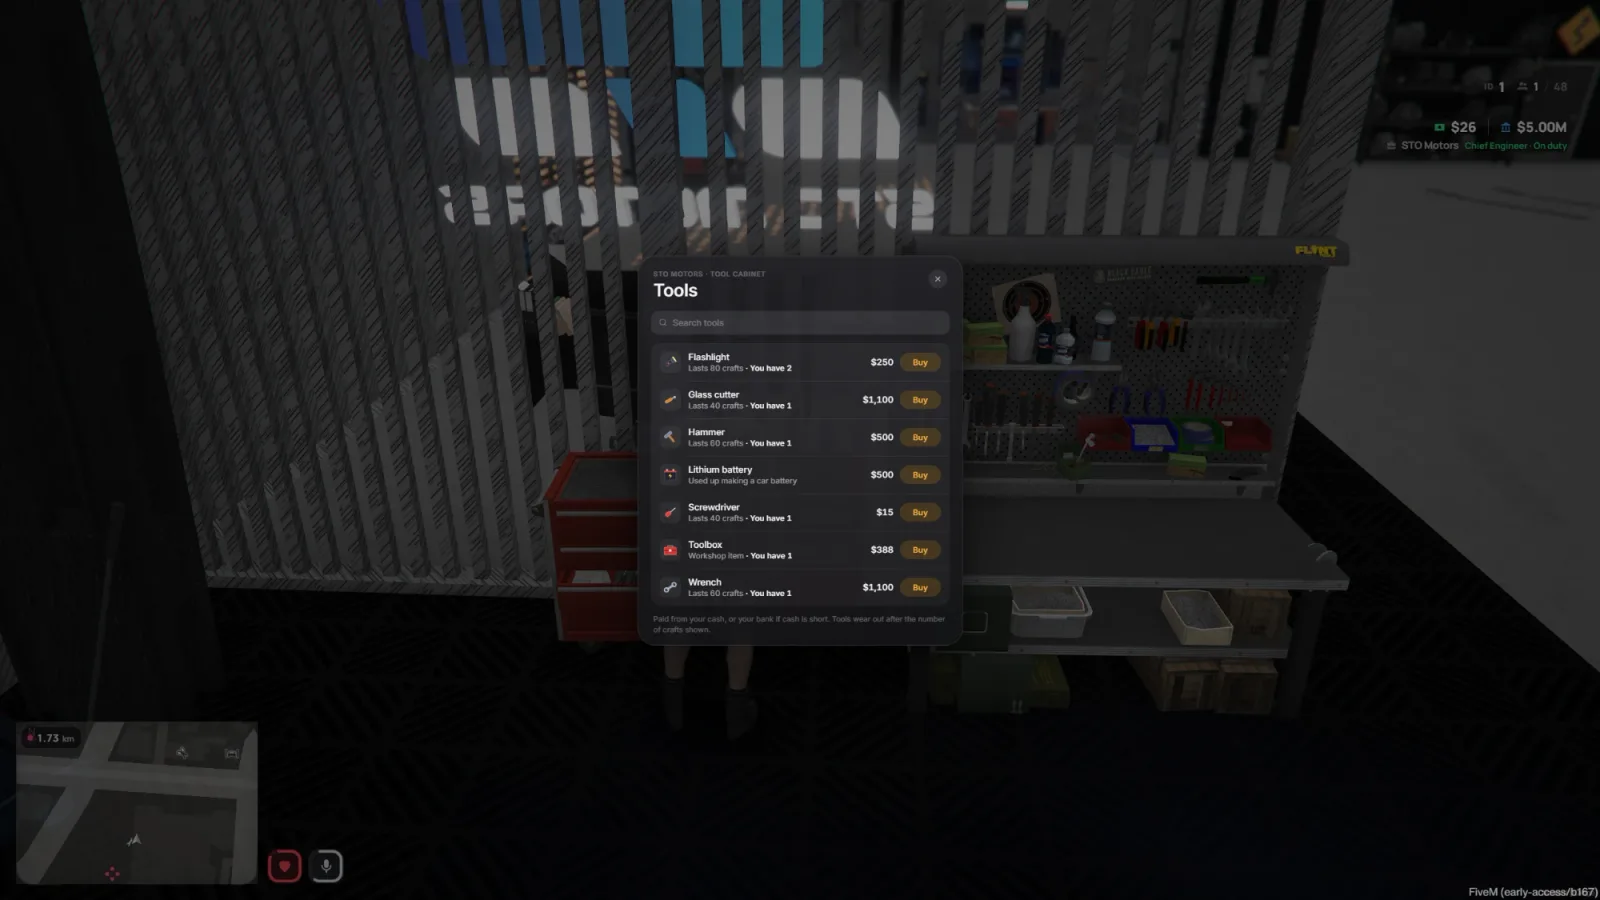
Buy tools at the red cabinet with your cash, or your bank if cash runs short. Each one lasts a set number of crafts and then breaks, so tools are a running cost of the job.

ToolPriceLasts
Wrench$1,10060 crafts
Glass cutter$1,10040 crafts
Hammer$50060 crafts
Flashlight$25080 crafts
Screwdriver$1540 crafts
Lithium battery$500Used up per car battery
Toolbox$388Opens the repair wheel from your hotbar
The tool cabinet with prices and uses The tool cabinet in game, in front of the red cabinet

Carry

The part is in your hands

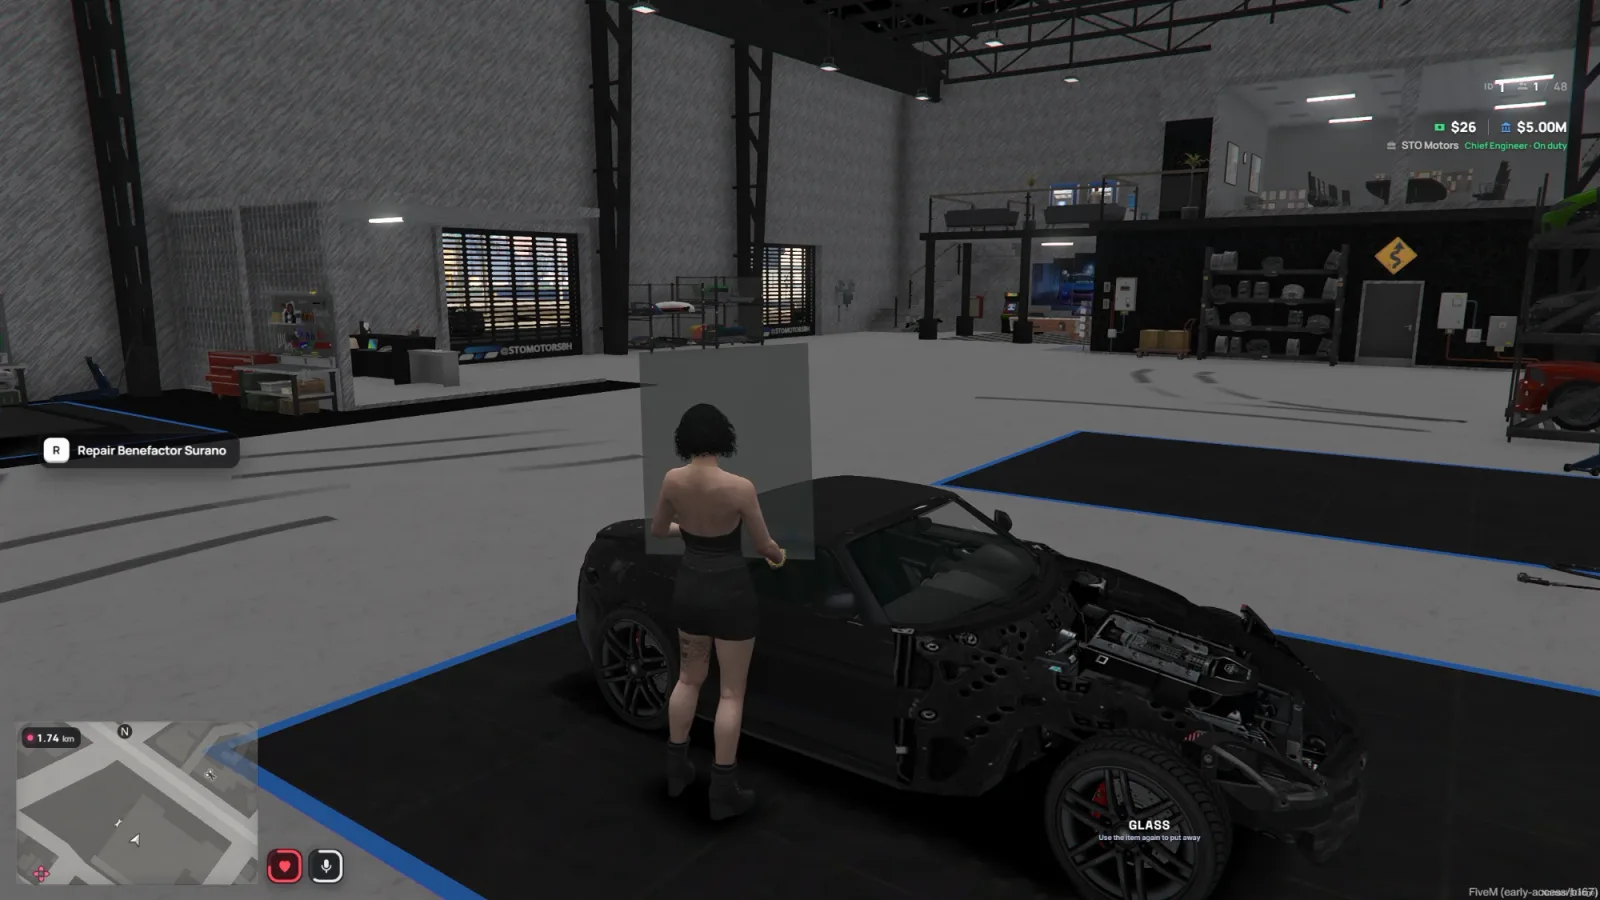
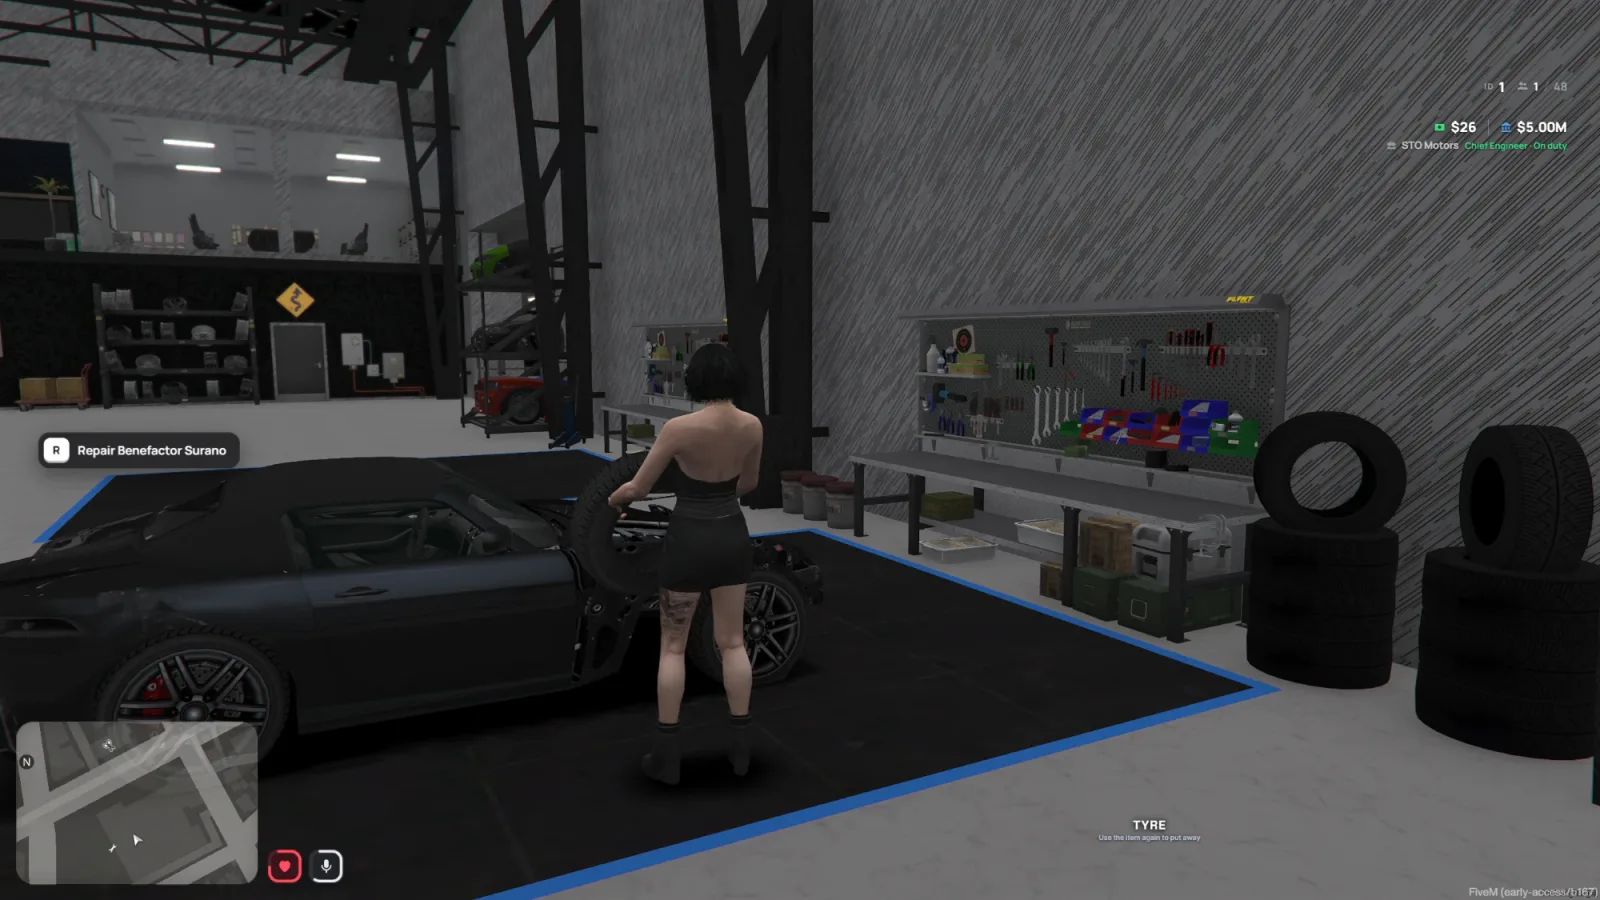
Use a part from your inventory and your character holds it: a battery against the chest, a sheet of glass, a whole door, a tyre. You can't sprint or jump with it. Walk to the car, press R, and the install takes it out of your hands. It's only used up when the job is finished.

Carrying a car battery
Battery. To the engine bay.
Carrying a sheet of glass
Glass. A full door pane.
Carrying a tyre to the car
Tyre. One per flat.

MLO Architect

Lay out your shop

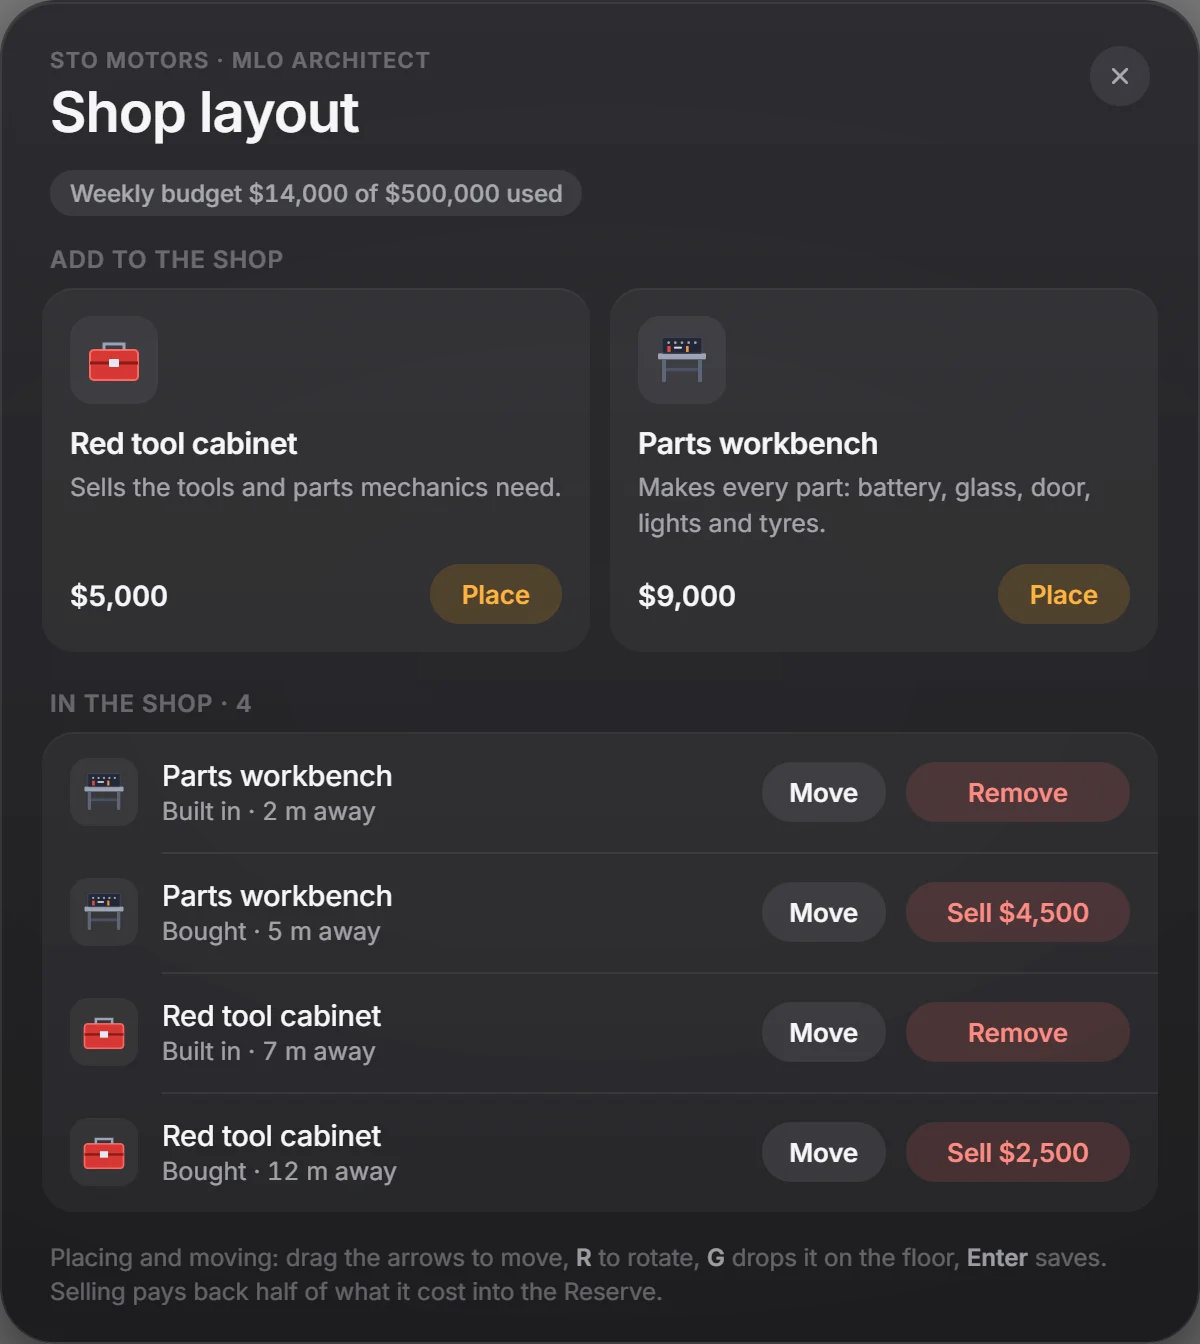
The Chief Engineer furnishes the workshop with /mechanic. Add red tool cabinets and parts workbenches, then place them with an on-screen gizmo while flying a free camera round the room. Move anything later, even the stations the map came with, and sell what you placed for half its price back into the Reserve.

  • Arrows to move, a ring to rotate. Red, green and blue arrows slide it along each axis, the yellow ring turns it, and dragging the body slides it on the floor.
  • A free camera. WASD to fly, Space and Ctrl for height, hold the right mouse to look, scroll to zoom.
  • Snaps to the floor. Press G to drop it on the ground. Enter saves, Esc cancels.
  • A weekly budget. Equipment is paid from the shop's Reserve budget of $500,000 a week.
WASD flyRMB lookG floorEnter saveEsc cancel
The MLO Architect: add a tool cabinet or workbench, move or sell what is in the shop

Money

Repairs move real money

STO Motors is a government garage. Labour is paid from the Central Reserve through Bucky Reserve, so no money is printed for a repair. Materials are bought and hauled in by truck, and customers pay invoices they agreed to.

Central Reserve via Bucky Reserve Mechanics labour + grade commission STO Motors equipment & warehouse Customers pay invoices they accept Port & depot materials by truck bounty per part $500k / week budget invoice steel, glass, rubber… sold kit: half back
$40,000Hourly cap on Reserve pay per mechanic
60 sFor a customer to accept an invoice. Nothing is charged before they agree.
6Raw materials stocked in the warehouse, from steel to ECU chips
15 minBefore the same car can be cleaned for pay again

Staff

Five grades, one ladder

Staff hire with /setjob. Higher grades earn more per shift and a bigger commission, and some parts can only be made from Technician up.

GRADE 0Apprentice$6015% commission
GRADE 1Technician$8520% commission
GRADE 2Senior Mechanic$11525% commission
GRADE 3Master Diagnostician$14530% · logistics
GRADE 4Chief Engineer$18035% · runs the shop
  • Every repair is checked on the server. The job, duty, the car (found from the network, never trusted from the client), its real damage and a timed repair session are all verified before anything is paid.
  • Parts are only used up when the job finishes. Cancel halfway and the part stays yours.
  • Payouts only happen if the Reserve can cover them. No reserve, no money from thin air.

Specs

What you need

Requirements

  • QBCore
  • oxmysql
  • Bucky Reserve for Reserve-paid labour and the shop budget
  • The STO Motors MLO, or any workshop you set with the Architect
  • FiveM or FiveM Enhanced

Commands

  • R or /examine open the repair wheel
  • /mechanic MLO Architect (Chief Engineer)
  • /invoice [id] [amount] [plate]
  • /payinvoice · /declineinvoice
  • /setjob [id] mechanic [0-4] hire

Built for servers

  • No progress-bar repairs: every part is fitted by hand
  • Damage read per part: 4 doors, 4 windows, 4 lamps, 4 tyres
  • Crafting keeps running if you step away or disconnect
  • Config for prices, bounties, grades, recipes and tools
  • Escrow protected, config open
The Bucky Ecosystem

One city. One ecosystem.

Bucky Mechanic is a government garage: every repair's labour is paid from the reserve and the shop's equipment comes out of its budget, so fixing cars never prints money.

Money and data movingJust joinedTap a script for details
With Bucky Reserve

Labour paid from the reserve

Each fitted part pays a labour bounty from the Central Reserve, with an hourly cap per mechanic. If the reserve can't cover it, nothing is paid, so no repair prints money.
With Bucky Reserve

A shop budget, not free furniture

Tool cabinets and workbenches come out of a weekly reserve budget, and selling one back returns half its price to the reserve.

With Bucky HUD

Prompts in the HUD's style

The repair prompt and every job notice show through Bucky HUD when it's installed, so the workshop looks like the rest of the city.

Coming next

The ecosystem keeps growing

  1. In development

    Bucky Inventory

    An advanced inventory system built to plug into the rest of the Bucky ecosystem.

  2. Planned

    Bucky Logistics

    The supply side of the city: warehouses and deliveries linked by player-driven trucks. When the chain stops, businesses run dry.

  3. Planned

    Bucky Clothing

    Clothing stores and outfits for the Bucky city.

Get Bucky Mechanic

Real repairs, part by part.

A complete mechanic job for QBCore. The repair wheel shows exactly which parts of a car are broken. Mechanics make each replacement at the workbench, carry it to the car and fit it by hand: ratchet the hinge bolts, vacuum the glass, torque the wheel nuts in a star. Labour is paid from the Central Reserve.

  • Delivered instantly to your Cfx.re Keymaster
  • Secure checkout by Tebex, the official FiveM store

What you get

  • Damage you can read. Press R by a car and the repair wheel shows each part in red, green or grey: the engine, every door, window, lamp and flat tyre.
  • Every part is made. One parts workbench makes batteries, glass, doors, lights and tyres from your tools and the shop warehouse. Tools wear out after a set number of crafts.
  • Fitted by hand. Six jobs done step by step: the engine in-world in 3D, plus close-ups for doors, windows, headlights, taillights and tyres. Slips are counted and graded.
  • A shop you lay out. The Chief Engineer places tool cabinets and workbenches with an on-screen gizmo and a free camera, moves them later and sells them back for half.

Requirements

  • QBCore
  • oxmysql
  • Bucky Reserve (labour pay and shop budget)
  • STO Motors MLO, or any workshop
  • Bucky HUD (optional)
FAQ

Bucky Mechanic questions

Does Bucky Mechanic need Bucky Reserve?

Labour bounties and the shop's equipment budget are paid from the Central Reserve through Bucky Reserve, and a payout only happens if the reserve can cover it. That's what keeps repairs from printing money.

Does a repair fix the whole car at once?

No. Each damaged part needs its own replacement and its own job. When every slice on the wheel is green, Apply repairs fixes the car and pays the labour.

Does it need the STO Motors MLO?

It's set up for STO Motors, but the Chief Engineer can lay out any workshop with the MLO Architect: place tool cabinets and workbenches, and move the built-in stations.

Is every repair checked on the server?

Yes. The job, duty, the car (resolved on the server, never trusted from the client), its real damage and a timed repair session are all checked before anything is paid.

Does it work on FiveM Enhanced?

Yes. It runs on both the classic FiveM build and FiveM Enhanced (the GTA V Enhanced edition of the platform).

How is it delivered?

After checkout the resource is added to the Cfx.re Keymaster account you signed in with. Download it from Keymaster and add it to your server like any other resource.

Is the code escrow protected?

The core is protected with Cfx.re Asset Escrow, so it can't be leaked or resold. The config files you need to tune it stay open and editable.